You do not need to specially create a user and allow remote connections to a MySQL Instance. While adding a MySQL Instance to the Policy, you can use the credentials of any MySQL user with full access to the MySQL server from localhost. For example, you can use a MySQL 'root@localhost' account typically created during the MySQL server installation. See Adding MySQL Instance to the Policy.
Customers with both 3.14 Server and Agent can use localhost for their MySQL instance hostname. The CDP Server does not connect directly to MySQL and instead connects to MySQL through the agent connection.
| Notice There is no relationship between a MySQL user and a CDP user. |
| Notice Admin access to the server and MySQL installation is required. |
| Tip In CDP, end-user level MySQL backup is not supported. Only super-users can conduct MySQL backup. Sub-users are limited by agent user permission. |
3.14 Version Limitation
Prerequisites:
- Multiple databases per MySQL Instance
- MySQL user with full access to one of the databases
The MySQL user can backup only databases that belong to him and cannot backup databases that do not belong to him.
Use the following command to allow the user to backup all databases:
| Notice The command will allow you to backup databases, but not restore. |
Allowing Remote Connections to MySQL Instance (Version 3.12 or Earlier)
By default, remote access to the MySQL database server is disabled for security reasons. Follow the instructions below to provide remote access to the database server.
| Important Notice For the MySQL Add-on to work, both the CDP Server and the Agent should have administrative permissions for the entire server. The CDP Server will backup the database data, while the Agent will lock and flush tables. Also, the CDP Server needs administrative permissions for restoring data. You can create a special user for backups in MySQL and limit access to MySQL from the CDP Server IP address. Also, you should provide access to this user from localhost and the 127.0.0.1 address for the Agent. |
Using Command Line Interface
1. First, log in over ssh to the remote MySQL database server. To do this, on Linux or Mac, open the terminal and execute the command:
Then you will be asked about an untrusted key. Enter "yes" and press <Enter>. Then enter the password.

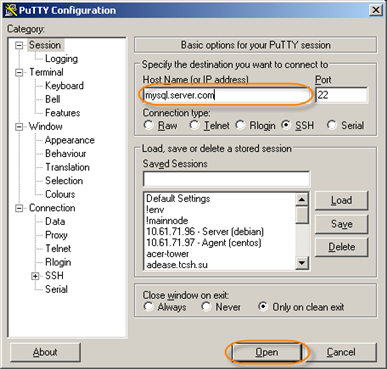
On Windows, you can use the PuTTy utility. Download it from this page - http://www.chiark.greenend.org.uk/~sgtatham/putty/download.html - launch it, enter "mysql.server.com" in the "Host name (or IP address)" input field, and click on the "Open" button.
When you are asked about an untrusted key, click on the "Yes" button.
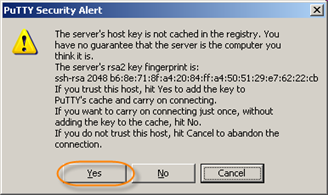
Then enter the login and password.

2. When the connection is established, you have to open the MySQL server configuration file my.cnf in a text editor such as vim.
Tip
|
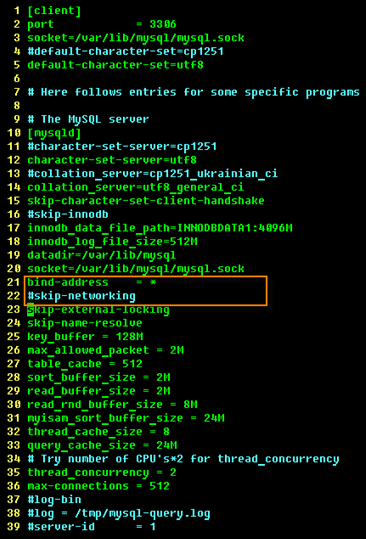
3. Open the file in a text editor and find the section starting with the line:
Make sure the line skip-networking is commented (or remove the line) and add the following line:
The entire section should look like this:
Where,
- bind-address - Contains an asterisk, meaning that the service should bind to all available IP addresses.
- skip-networking - Do not listen for the TCP port at all. All interactions with mysqld must be made via the Unix domain socket. This option is highly recommended for systems where only local requests are allowed because it provides more security. Since you need to allow a remote connection, this line should be removed from my.cnf or commented out.
4. Restart the mysql service.

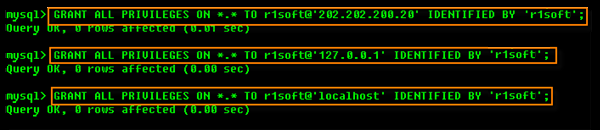
5. Grant access to the MySQL server from the IP address of the CDP Server. You should also grant access from IP address 127.0.0.1 and localhost, since the lock and flush operations during the snapshot will be performed by the agent running on the same host as MySQL service. The CDP Server will connect to MySQL as "r1soft" user.
Connect to the MySQL server by executing the following command:
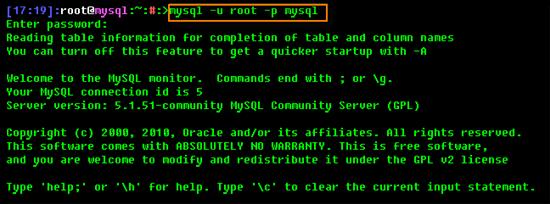
Enter the MySQL root password when prompted.
CDP should be able to backup all databases, so you should grant global privileges to the "r1soft" user.
| Notice There is no relationship between a MySQL user and a CDP sub-user. |
| Notice Admin access to the server and MySQL installation is required. |
| Tip In CDP, end-user level MySQL backup is not supported. Only super-users can conduct MySQL backup. Sub-users are limited by agent user permission. |
In the following example, it is assumed that the IP address of the CDP Server is 202.202.200.20 and that the CDP Server will connect with username "r1soft" and password "r1soft" without quotes.
6. Log out of MySQL by typing the following command:

7. Make sure that there is no firewall that blocks connections to TCP port 3306 of the MySQL server from the CDP Server. It is not always possible to check all the firewalls between one server and the other. But you can always check local iptables firewall on the MySQL server. To add the rule that permits connections to TCP port 3306 from CDP Server with IP address 202.202.200.20, execute the following command:
If you have several CDP Servers that reside on IP subnet 202.202.200.0/24 and the MySQL server can be backed up by any of them, you can allow access to TCP port 3306 from the entire subnet in one command:
Finally, save firewall rules so they will be automatically reloaded when the server reboots:

8. Test that your firewall settings and MySQL security settings allow you to connect to the MySQL server from the CDP Server. Execute the following command:
Where,
- -h IP or hostname - mysql.server.com is the hostname (FQDN) of MySQL server.
- -u r1soft - Log in as MySQL user r1soft.
- -p - Prompt for password.

You can also test if port 3306 is reachable through the firewall using telnet:

If the port is reachable, you will see the following message:
Then some garbage characters along with the MySQL version string (here MySQL version is 5.1.51-community). To close the telnet, press the <Ctrl> + <]> keys or just wait until the connection is closed on timeout.
Using GUI Tools
| Notice Using GUI tools described in this document only allows you to grant permissions on the MySQL server level. You still have to make sure that the MySQL server listens for network connections and that the firewall does not block its port. There are web applications that allow you to do this in GUI. For example, the popular hosting management panel Webmin allows you to edit firewall rules and text files as well as restart services. Another popular hosting management panel - Parallels Plesk - also allows you to edit firewall rules. Covering all available tools goes far beyond the scope of this documentation. |
Granting Permissions Using phpMyAdmin
PhpMyAdmin (http://www.phpmyadmin.net/) is an open source web application written in PHP. It is very popular among web developers because of its intuitive interface and ease of use. A lot of web hosting management panels include phpMyAdmin in their interface.
In the following example, it is assumed that the IP address of the CDP Server is 202.202.200.20 and that the CDP Server will connect with username "r1soft" and password "r1soft" without quotes.
1. First, open phpMyAdmin in your browser and log in.

2. Click the "Privileges" link. Depending on the version of phpMyAdmin, this link can be found in different parts of the window.

3. Click the "Add a new User" link.

4. On the "Add a New User" window, do the following:
- Enter "r1soft" in the "User name" field.
- Select the "Use text field" option from the drop-down menu next to "Host" and enter 202.202.200.20 in the field next to the option list.
- Enter "r1soft" in the "Password" and "Re-type" fields.
- Click "Check all" next to "Global privileges."

Scroll down and click on the "Go" button.

You will be notified that the user has been successfully created.

5. Repeat steps 2-4. This time, type "127.0.0.1" instead of "202.202.200.20" in the "Host" field.
6. Repeat steps 2-4 again. This time select "Local" in the option list next to the "Host" field. You will not have to type "localhost" in the input field as it will appear there automatically.

Granting Permissions Using HeidiSQL
HeidiSQL(http://www.heidisql.com/) is a freeware Windows application written in Delphi. It is popular among web developers because of its intuitive interface and ease of use. It can be installed on a laptop and can be used for managing MySQL servers that do not have phpMyAdmin installed.
In the following example, it is assumed that the IP address of the CDP Server is 202.202.200.20 and that the CDP Server will connect with the username "r1soft" and password "r1soft" without quotes.
1. First, launch HeidiSQL and press the "New" button to enter MySQL server credentials.

2. Enter the session name in the list on the left, the Hostname or IP address of the MySQL server, the username, and the password, and press "Save."
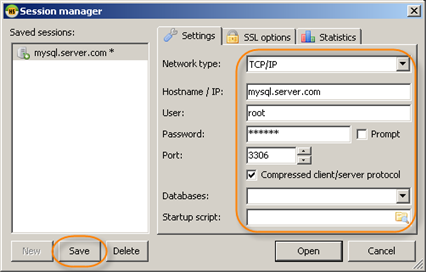
Then press "Open."

You will see the main window of the application.

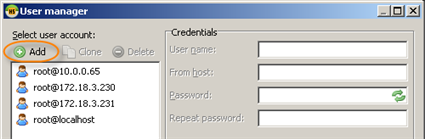
3. Select Tools > User manager from the application menu.

You will see the User manager window.

4. Click on the "Add" button.
5. Then do the following:
- Enter "r1soft" in the "User name" field.
- Leave the default value "localhost" in the "From host" field.
- Enter "r1soft" in the "Password" and "Repeat password" fields.
- Check the box next to "Global privileges."
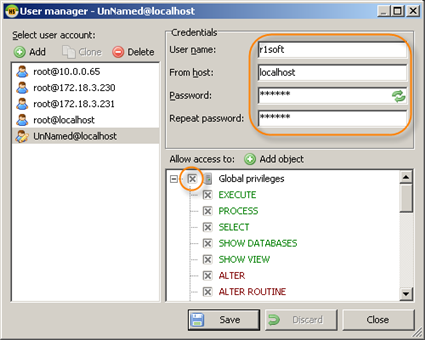
6. Click on the "Save" button.

7. Repeat step 4. This time enter 127.0.0.1 in the "From host" field.
8. Repeat step 4. This time enter 202.202.200.20 in the "From host" field.
9. Click on the "Close" button to close the "User manager" window.
