After you have copied the Backup Manager public key to the Backup Agent, you can add this server to your Backup Manager. For more information about copying the Backup Manager public key to the Backup Agent, see Add the key to Windows Backup Agent, and Add key to Linux Backup Agent.
You can choose one of two available methods of adding a server to the Backup Manager:
- Using the Add a Server wizard
- Using the Manual Method (see below)
Follow the instructions below to manually add a server to your Backup Manager.
1. In the Main menu, click Servers.
2. Click Add Server in the Servers menu located in the top left area.

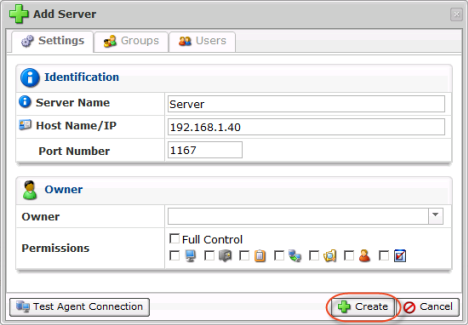
3. The "Add Server" window will appear. You will need to define the following options:
- Server Name - Enter a name for the server. It will be displayed in the "Servers" List.
- Host Name/IP - Enter the host name or IP address of the server.
- Port Number - Define a Port to connect to the server if different from the default value of 1167. You can configure the default server port using the Windows Backup Manager Configuration Utility. See also: Configure Backup Agent port
| Tip If you have servers in your environment with the same IP address but different ports, create several DNS names that resolve to the host's IP. Specify the different server port numbers. |

To assign a server owner, choose a power user from the drop-down list.
| Note If the users or groups are not enabled in the Product Features, you cannot see the “Owner” section of the "Add Server" dialog. |

After assigning the server owner, you can define permissions by selecting the corresponding check boxes.

| Note A Power-User who creates a server is an owner by default. |
4. To assign group(s) to the server, switch to the "Groups" tab.

Select a group name from the drop-down menu, and then click the "Add" icon.

After assigning the group, you can define its permissions by selecting the corresponding check boxes.

| Note You can find the group permission descriptions in Access groups. |
5. To assign user(s) to the server, switch to the "Users" tab.

Select a user name from the drop-down menu, and then click the "Add" icon.

After assigning the user, you can define permissions by selecting the corresponding check boxes.

| Note You can find the user permission descriptions in Edit user account properties. |
6. After you have finished configuring the settings, click "Create."
7. The server appears in the Servers list.
