The Backup Manager comes with SSL already set up. By default, SSL works with a self-signed certificate. This certificate can be used for encryption only and does not prove the identity of the server.
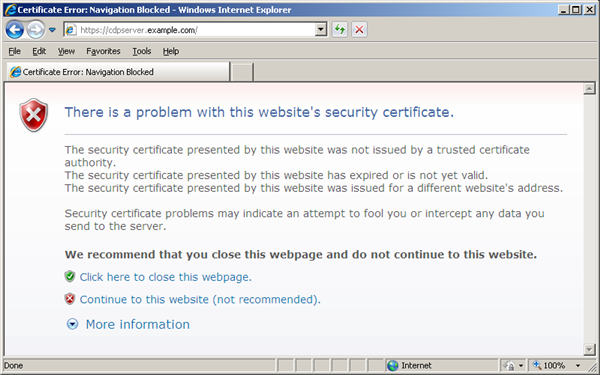
That default certificate is not signed by any well-known Certification Authority (CA), so when the users try to open the SSL version of the Backup Manager Web Interface, they usually see the warning in the browser window (see the image below).
If you decide to continue working with this self-signed certificate, you have to perform several steps to "accept" the certificate before you access the site. This usually occurs only the first time you access the site. Then the self-signed certificate is stored in the browser database marked as trusted. This scenario is suitable for testing purposes or for running the Backup Manager on the company's internal networks.
But if you want to provide a Backup Manager SSL interface to the outside world, you should obtain a certificate signed by a well-known CA. The role of a CA is to verify that the Backup Manager you are trying to access actually has the name you are trying to access it by, and that this server actually belongs to your organization.
Obtaining CA-Signed Certificate for Production Use
Certificates for production use are issued by trusted 3rd party Certification Authorities (CAs). Many CAs simply verify the domain name and issue the certificate, whereas others (VeriSign, etc.) verify the existence of your business, the ownership of your domain name, and your authority to apply for the certificate, providing a higher standard of authentication.
Every browser comes with a pre-defined list of well-known CAs.
Along with the name of your organization and the name of your server, a CA-signed certificate contains the public key of the server. This public key is used by the browser to encrypt data sent to the server. There is a private key on the server. The server uses the private key to decrypt the data encrypted by the public key. The private key should be kept secure on the server to prevent unauthorized access.
To learn more about public key cryptography, you can read this wikipedia page http://en.wikipedia.org/wiki/Public-key_cryptography. To learn more about certificates and steps to buy a certificate, you need to take a look at CAs' websites. Some of the most well known CAs are:
Generating Certificate Request
Before the CA can issue you the certificate, you should generate private key and the certificate request and send it to the CA for signing. For the instructions below to work, the certificate request and the private key should be generated with the openssl command, the same way as for Apache web server. If you decide to buy the certificate from GoDaddy - very popular hosting provider, which also issues the certificate - generate the private key and certificate request according to http://support.godaddy.com/help/article/5269/generating-a-certificate-signing-request-csr-apache-2x.
| Note While generating the private key and certificate request In Windows, you should replace the openssl command with the full path to binary, for example, C:\OpenSSL\bin\openssl. |
Importing Certificate into the Trust-Store
The following steps show you how to install a SSL certificate purchased from a Certification Authority. Your SSL vendor may have different instructions, please check with them for proper certificate installation. The following examples refer to GoDaddy and VeriSign.
To enable a certificate, you need to use the Java keytool - a key and certificate management utility. The keytool stores the keys and certificates in a so-called keystore.
1. Establish a SSH connection to the Linux server where the Backup Manager is installed. Or log in on the text Linux console.
You should either log in as root or obtain root permissions after login via su or sudo command.
| Note Your home directory should be set to /root. |
2. Upload the key and the certificate to Backup Manager.
3. Use the cd command to go to the directory where the keys are in.
4. Run the following commands to convert the key and the certificate files from PEM into DER format.
5. Use the cd command to go to the directory where keytool is located.
Give everybody the permissions to execute the keytool and java applications. The versions of these application hat come with Backup Manager are not executable, so you have to run chmod 755 it.
6. Use the wget command to download the ImportKey utility:
7. Run the following command. It will launch the ImportKey utility and create the keystore file (default name is keystore.ImportKey) in your home directory (root). The private key and the certificate will be placed there.
| Note The keystore's password and the key's passwords must be set to password. |
8. The following command will allow you to set the password for your keystore file. The default password is importkey. Enter it when prompted and then type the new password, which must be set to "password".
9. This command will allow you to set the password for the key file in the keystore. The default password is importkey. Enter it when prompted and then type the new password, which must be set to "password".
10. Rename the keystore.ImportKey file (default name) into keystore.
11. Run the following command to download the trusted certificate from the Certification Authority (CA). In our example, we connect to Go Daddy.
12. Import the received trusted certificate into your keystore file.
13. You may have another keystore in your R1Soft folder. To make a backup copy of it, you should rename it (for example, to "keystore.old" as shown in the following example).
14. Copy the new keystore file to your R1Soft folder.
15. Restart Backup Manager.
keytool Options
- - alias - All keystore entries are accessed via unique aliases. Aliases are case-insensitive. An alias is specified when you add an entity to the keystore using the -import command. Subsequent keytool commands must use this same alias to refer to the entity. The alias should be set to "cdp".
- - file - Define absolute or relative path to your certificate file. If you define only file name, it means, that the file is located in the root directory.
- - keystore - Each keytool command has a -keystore option for specifying the name and location of the persistent keystore file for the keystore managed by keytool. A keystore is created when you use -import command to add data to a keystore that does not already exist. If you do not specify a -keystore option, the default keystore is a file named .keystore in your home directory (as determined by the "user.home" system property). If that file does not already exist, it will be created.
Read more about Java keytool for Linux:
http://download.oracle.com/javase/6/docs/technotes/tools/solaris/keytool.html.
Configuring Backup Manager for SSL Communication
See Web Server Options.