A Host must have a Disk Safe before any Replication can be run.
| Notice Disk Safes should always be placed on reliable storage. For more Disk Safe best practices, see Disk Safe Best Practices. |
Follow the instructions below to create a Disk Safe in your CDP.
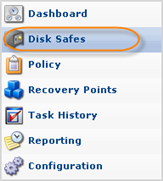
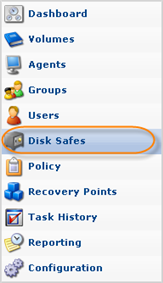
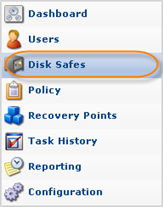
1. Click on "Disk Safes" in the Main Menu to access the "Disk Safes" page.
| Standard Edition | Enterprise Edition | Advanced Edition |
|---|---|---|
 |
 |
 |
2. In the "Disk Safes" menu, click on "Create New Disk Safe."
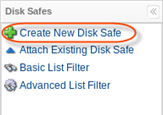
| Tip Alternatively, you can click on "Create a Disk Safe" located at the top of the Dashboard.  |
| Note You can also create Disk Safes using the "Disk Safes" tab of the Agent "Details" Pane. This screen provides the same functionality as the main "Disk Safes" screen. See more information in Accessing Agents. |
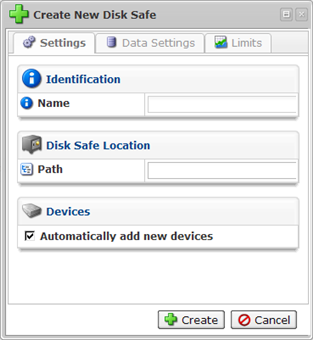
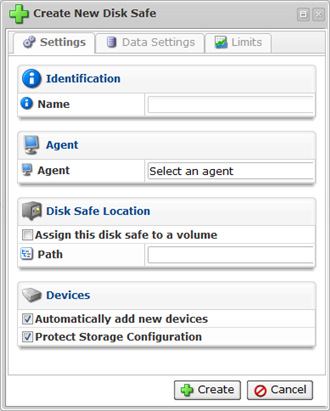
3. The "Create New Disk Safe" window will open.
| Standard Edition | Enterprise Edition | Advanced Edition |
|---|---|---|
 |
 |
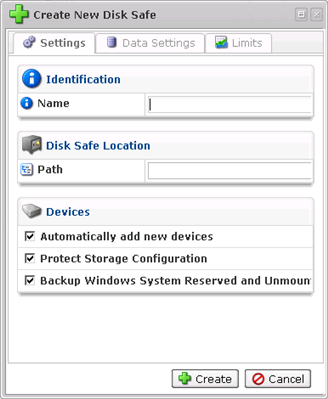 |
4. The window contains the following tabs:
- Settings
- Data Settings
- Limits
5. Define the following settings specific to the new Disk Safe:
Settings Tab
Identification
- Name - Define the name for the Disk Safe. It will be used to identify the Disk Safe in the list.
Agent (Enterprise Edition)
- Agent - Here you can select an Agent from the drop-down menu.
Disk Safe Location
- Path - Path where the Disk Safe is physically located. For example, C:\Disk_Safe.

Note
Here you can assign a Disk Safe to a Volume. Click on the corresponding checkbox.
Devices
- Automatically add new devices - This option will automatically add all available Devices to the Disk Safe. Uncheck the checkbox to select the devices you want to add to the Disk Safe. If you do not select this option, then the "Add Devices to Protect" dialog window will appear once you save the Disk Safe. Read more Accessing Devices, Adding Devices.
- Protect Storage Configuration (Enterprise Edition, Advanced Edition) - This option allows you to back up partition tables.
- Backup Windows System Reserved and Unmounted Partitions (Advanced Edition) - This option allows you to back up hidden Windows system partition.
Data Settings Tab
Compression
- Compression Type - The compression level set for the Disk Safe. Possible values: "ZLib Low," "ZLib Medium," "ZLib High," "QuickLZ," and "NONE."
Encryption
- Encryption Type - You can assign an AES 256-Bit encryption to the Disk Safe. In that case, you will be asked to create a password. If you choose to encrypt a Disk Safe, the password must be supplied to: browse files, browse Control Panel users, browse databases, and initiate BMR. Read more in Managing Disk Safe Encryption.
Note
Configured at create, encryption cannot be turned on/off.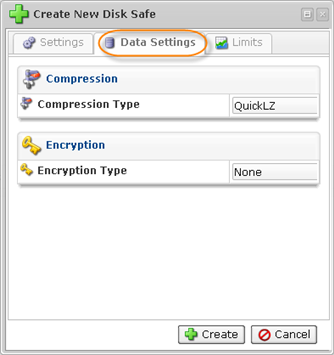
Limits Tab
This tab allows File Excludes, Recovery Point Archiving ,and Control Panels to be enabled/disabled. Limits can be defined for Replication, Recovery Points, and Archive Points.
| Tip When you assign a Disk Safe to a Volumes, all Volume's limits are applied to that Disk Safe. That it why the Disk Safe's limits should be at least as restrictive as Volume's. For example, if a Volume has a Recovery Point limit set to 100, the Disk Safe can only contain 100 Recovery Points or less. |
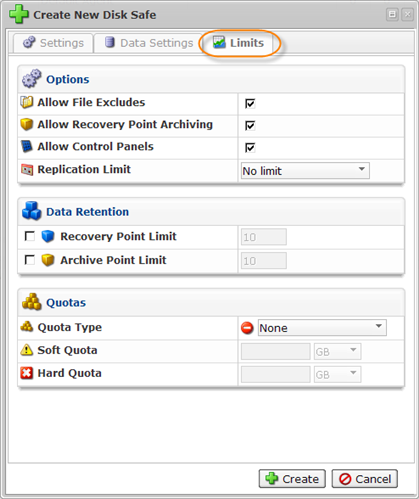
Options
- Allow File Excludes - Check this option to activate the File Excludes feature for the Disk Safe. If you check this option, then the system will allow you to specify files/folders which will not to be backed up during the replication Policy. By default, all file/folders from the selected Devices are replicated. Read more in About File and Folder Excludes, Excluding Files and Folders.
You cannot activate this option if it is not activated for the Volume to which the Disk Safe belongs. - Allow Recovery Point Archiving - Check this option to activate the Archiving feature for the Disk Safe. If you check this option, the system will allow you to create archives of your data on a specified hour, day, week, or month. If the option is enabled, then you can specify the "Archive Point Limit" under "Data Retention." Read more in Archiving.
You cannot activate this option if it is not activated for the Volume to which the Disk Safe belongs. - Allow Control Panels - Check this option to activate the Control Panels feature for the Disk Safe. If you check this option, the system will allow you to backup and restore Hosting Control Panel user accounts. Read more in CDP for Hosting Control Panels.
Tip
You cannot activate this option if it is not activated for the Volume to which the Disk Safe belongs.Tip
There is a system-wide option to enable the Hosting Control Panels feature (Configuration Product features "Enable Hosting Control Panels" option under "Hosting Control Panels"). Read more in Enabling Hosting Control Panels Feature.
 - Replication Limit - This option defines the lowest replication frequency for that Disk Safe. For example, if you set the replication limit to "weekly," then the Policy assigned to that Disk Safe can only be weekly or higher (hourly and daily replications will be restricted).
Tip
The Disk Safe Replication Limit must be within the limits of the Replication Limit of the Volume to which the Disk Safe is assigned.
Data Retention
- Recovery Point Limit - The maximum number of Recovery Points stored in the Disk Safe.
Tip
The Disk Safe Recovery Point Limit must be within the limits of the Recovery Point Limit of the Volume to which the Disk Safe is assigned. - Archive Point Limit - The maximum number of Archive Points stored in the Disk Safe.
Tip
The Disk Safe Archive Point Limit must be within the limits of the Archive Point Limit of the Volume to which the Disk Safe is assigned.
Quotas
- Quota Type - The type of quota assigned to the Disk Safe. Quotas are set to limit the disk usage of the Disk Safe. The limit is set on the basis of space occupied by Disk Safes or the size of deltas.
- Soft Quota - The value in bytes or in deltas. Soft Quota is a warning level that informs users that they are close to reaching their effective limit.
- Hard Quota - The value in bytes or in deltas. Hard Quota allows resources to be occupied by data. If the Hard Quota is reached, then the system forbids generation of new Recovery Points. The replication is interrupted and fails.
6. Define the necessary Disk Safe properties and click "Create."

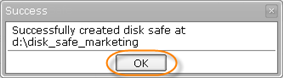
7. If you have specified a non-existing directory for the Disk Safe, you are now prompted to create a new directory. Click "OK."

8. The new Disk Safe will be created.
Adding the Devices
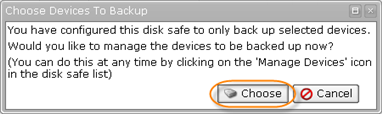
Here you can find brief instructions on how to add Devices. You can find more information in Adding Devices. If you have selected the "Choose Devices to Backup" option, follow the instructions below.
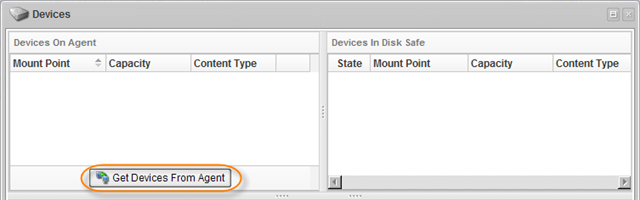
1. You will be asked if you want to manage the Devices at this time. Click "Choose" to open the "Devices" window.
2. In the "Devices" window, click on "Get Devices from Agent."
| Troubleshooting The following error message may appear after clicking the "Get Devices From Agent" button. 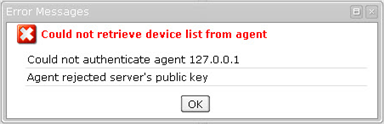 In this case, make sure that server.allow folders in both the Server and Agent directories contain the text file with the same Server Public Key. The key can be found in Configuration |
3. All Host Devices are listed in the "Devices On Agent" pane.
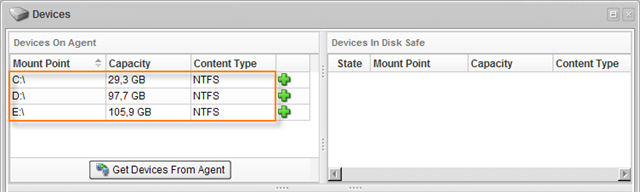
4. Click on "Add" (the green plus icon) in front of a Device.
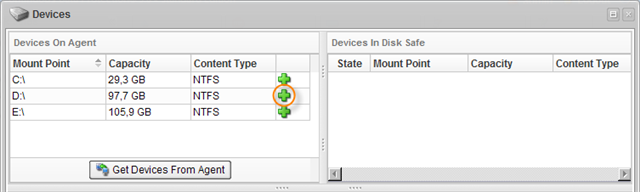
5. The assigned Devices will be listed in the "Devices in Disk Safe" on the right side.
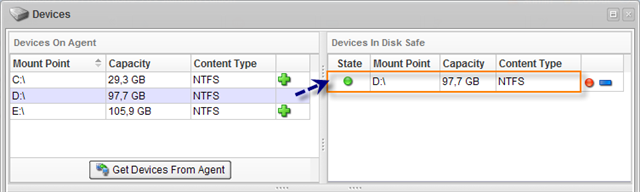
6. Add as many Devices as you need for the Host.
7. After you have assigned all needed Devices, close the "Devices" window.

Viewing Created Disk Safe
1. The new Disk Safe will appear in the Disk Safes list.

| Tip Click on an item in the Disk Safes list to see the Disk Safe details in the bottom pane. 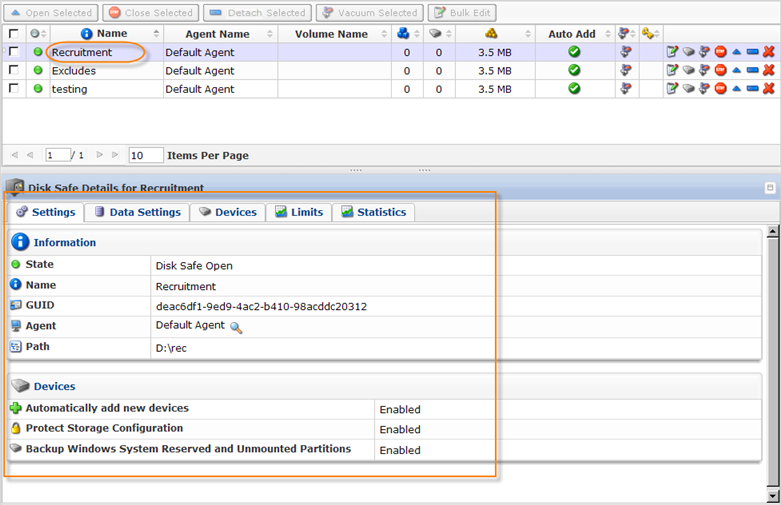 |
You can find more information on how to use the "Disk Safes" window in Accessing Disk Safes.
| Notice You need to create a Policy to replicate (back up) the Devices assigned to the Disk Safe. See Creating Policies. |