1. Install Standard Edition Using YUM
1.1 Configure YUM Repository
YUM is the easiest way to keep programs up-to-date on RedHat-compatible distributions. YUM downloads and installs the latest version of a program. The YUM repository should be configured to manage installations of and upgrades to CDP Standard Edition.
First, create a YUM .repo file with the R1Soft repository information. Save the file in the yum.repos.d directory, which is typically located in /etc/.
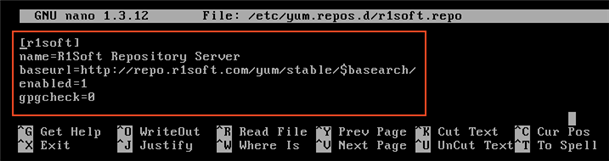
1. Open the new file with a text editor such as vi or nano:
or

2. Insert the following text into the file and save the file:
| Tip $basearch is a YUM variable, i.e., the base architecture (32-bit, 64-bit, etc.). |
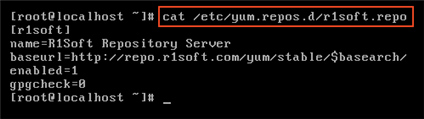
3. To verify what is written to the file, use the following command:
1.2 Install the Package
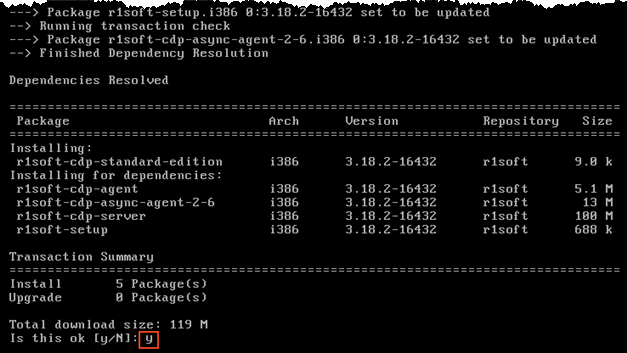
1. With the installed YUM repository, you can use the following command to install CDP Standard Edition:

2. In order to to download all dependencies of the package and install them, enter "y" and press <Enter>.
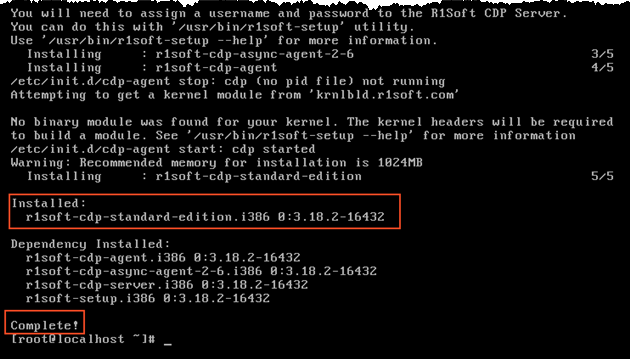
3. The installation is complete:
4. Once complete, you can use the help command to list all available options:
5. Now, proceed to Step 3.
2. Install Standard Edition Manually
2.1 Download CDP Standard Edition
See Obtaining Linux CDP Standard Edition.
2.2 Make Sure You Can Unzip the Download
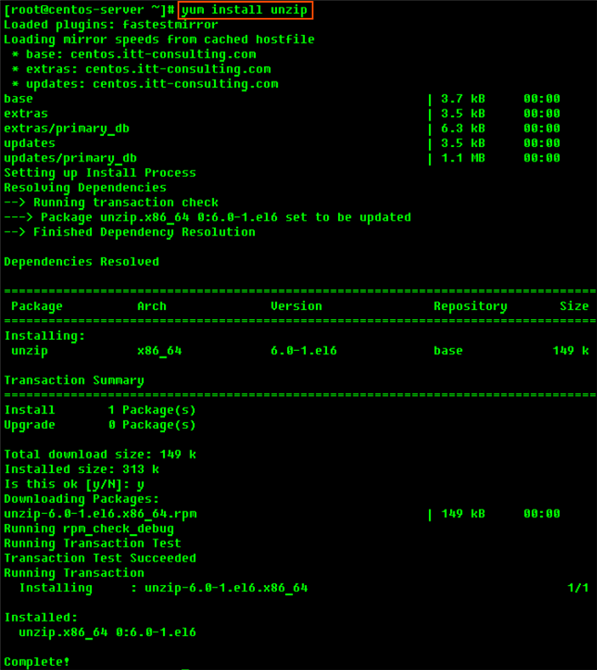
Most Linux distributions come with the unzip utility pre-installed. To determine if you have the unzip utility, run:
This should return an output similar to the following:

If it returns the following output, you need to install the unzip utility first:
To install unzip on RHE, CentOS, and Fedora:
2.3 Extract the ZIP File
We recommend creating a temporary directory to which you can extract the contents of the ZIP file.
1. Use the mkdir command to create a temporary directory (in our case, cdp).

2. Use the mv command to move the archive to that directory. Note that Linux file names are case-sensitive. Make sure you type the name correctly (in our case, "cdp-standard-edition-linux64.zip").
3. Use the cd command to go to that directory.
4. Use the unzip command to extract the files.

2.4 Install the Packages
| Notice You must be a Linux root user to install CDP Standard Edition. |
The archive you have extracted contains two folders: one with .deb packages (in our case, "deb-linux32") and one with .rpm packages ("rpm-linux32"). If you are installing on RedHat and CentOS, select the .rpm package.
Each folder contains a set of CDP components:
- r1soft-cdp-standard-edition
- r1soft-setup
- r1soft-cdp-agent
- r1soft-cdp-async-agent-2-6
- r1soft-cdp-server
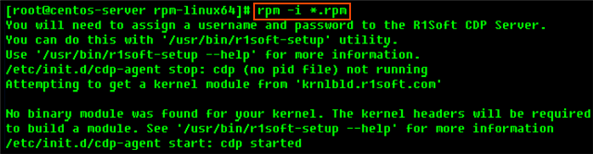
You will need to install all of them in one step. Use the cd command to go to the folder with the packages (in our case, deb-linux32) and run the following command:
RPM 32-bit (x86) / RPM 64-bit (x86_64)
3. Configure and Start the CDP Server Web-based User Interface
1. You must define a username and password for the CDP Server Web Interface before you can begin using CDP Standard Edition.
For example, you can set the "admin" login and "r1soft" password:
After running this command, you will see an output similar to the following:

2. Configure ports, if necessary.
By default, the embedded web server in CDP Standard Edition required for the Web-based Interface will listen on TCP ports 80 (HTTP) and 443 (HTTPS). These ports are frequently used by your Linux server (e.g., by Apache). If you are already using ports 80 and 443, you will need to define different ports. Ports 8080 (HTTP) and 8443 (HTTPS) are recommended alternatives to standard 80 and 443. However, you can choose any other valid and unused TCP port. Example:
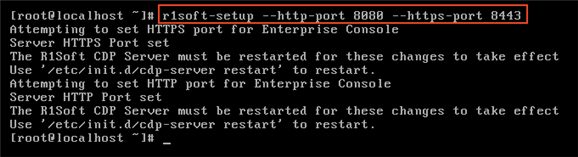
| Note You may need to change the firewall rules, depending on where you are connecting to the Web Interface from. |
3. Start the Web Interface (CDP Server):

You should now be able to connect to the CDP Standard Edition Web Interface using Firefox or Internet Explorer. See Accessing Standard Edition Web Interface.
4. Install CDP Linux Device Driver
CDP Device Driver is a proprietary, loadable Linux kernel module distributed by R1Soft. It is loadable at run-time without restarting Linux, and you do not need to recompile your Linux kernel to use it. R1Soft does not provide prebuilt modules for the popular kernels anymore, so you will have to compile the module from source.
| Notice You need to have loadable modules enabled as a feature in your kernel, and this is standard on all popular Linux distributions. |
4.1 Compiling CDP Kernel Module Against Kernel Headers or Kernel Source Tree
Using a pre-built binary module package is not possible anymore. You will have to compile this module against kernel headers or a kernel source tree. We are not always able to compile kernel modules from kernel-devel packages supplied by most major Linux distributions. In some cases, packages are missing header files (broken), or the packages have been stripped of information that any device driver would need to compile a kernel module. In these cases, we can build using your installed kernel-devel package on your Linux server, as r1soft-setup will obtain the missing information it needs to compile a module from your running kernel.
In order for kernel module compilation to work, you should have Internet connectivity directly from the Linux server you are installing CDP on, to TCP port HTTPS (443), on the host krnlbld.r1soft.com.
You can test connectivity with the following command (this may take a minute):
4.2 Install Kernel Sources
If you are using an unmodified kernel provided by CentOS installer, install the kernel-devel package:

4.3 Verify that the Source Matches Your Running Kernel
Sometimes, the kernel-devel package is newer than the installed and running kernel. If the kernel-devel is too old and not found, please follow the instructions on how to setup access to older yum packages as documented here.
4.4 Build the CDP Kernel Module Online (direct Internet connection to R1Soft build server)
To attempt to build the kernel module, run the following command (this may take several minutes):
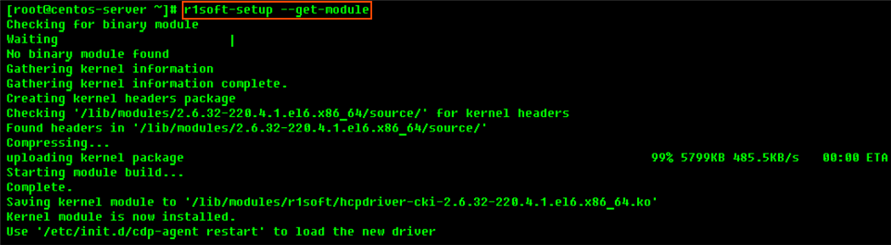
If module has been compiled and installed successfully, you will see an output similar to the following:
4.5 Build the CDP Kernel Module Offline (without direct Internet connection to R1Soft build server)
If there is no direct Internet connection between your CDP server and R1Soft build server, it is still possible to compile the kernel module. In this case, this will be tree-step process. First, you will have to create tarball file with the kernel headers. When you should copy this tarball file from the server to some other computer which has Internet connection to R1Soft build server. From this computer you should upload the tarball to the R1Soft build server and wait for the compilation to finish. When it is finished, you should download binary module and copy it back to the CDP server. Start with executing the following command:
After running this command, you will see:

4.6 Last Step
- Copy the generated tar.gz file and paste it to a computer with Internet access.
- Go to https://krnlbld.r1soft.com/ and upload the .tar.gz file to build a kernel module.
- After the build, you will download a kernel module.
- Copy this module and paste it to your Linux Server and the folder /lib/modules/r1soft.
- Restart the Agent (/etc/init.d/cdp-agent restart).