To obtain the Enterprise Edition trial software using R1Soft Customer Portal, perform the following steps:
1. The software for Windows CDP Server 3.18.2 can be obtained via direct download from the R1Soft website at
https://dist.r1soft.com/download/.
2. Log in to the R1Soft Customer Portal by entering your User Name and Password in the form on the right side of the screen. Registration is required for all downloads.
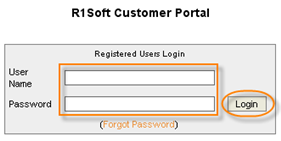
| Note Existing customers use their R1Soft Customer Portal Login. The forum and tech support help desk have different logins. New customers can request a free trial download at http://www.r1soft.com/nc/company/download-cdp-enterprise-edition-trial/. |
3. Click on the "Download CDP 3.0 Products" link.

4. Locate the "CDP Enterprise Edition" product group.
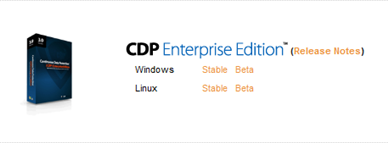
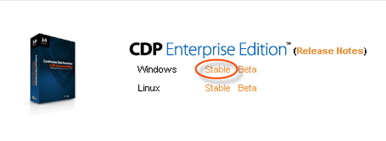
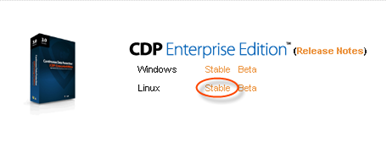
5. Click on the "Stable" link for the Windows or Linux product to download its stable release.
Windows:
Linux:
6. On the "Stable Release Downloads" page, select the most recent version. The version number is displayed in the "Version" column. The release date is displayed in the "Date" column. The most recent versions are displayed at the top of the list.
Windows:

Linux:

| Note You can view the release notes here: Release Notes. |
7. Select the product to download.
Windows:
Click on the "Windows 32-bit (x86)" link for 32-bit binary Hardware/OS or on the "Windows 64-bit (x86_64/AMD64)" link for 64-bit binary Hardware/OS.

Linux:
Click on the "Linux 32-bit (x86)" link for 32-bit binary Hardware/OS or on the "Linux 64-bit (x86_64/AMD64)" link for 64-bit binary Hardware/OS.

8. Click on "Back" to return to the software list.

9. The following product should be downloaded:
For 32-bit Windows system:
- File name - R1Soft-EnterpriseEdition-win32-3.18.2.zip
- File size - 288.91 MB
For 64-bit Windows system:
- File name - R1Soft-EnterpriseEdition-win64-3.18.2.zip
- File size - 307.26 MB
For 32-bit Linux system:
- File name - R1Soft-EnterpriseEdition-linux32-3.18.2.zip
- File size - 359.24 MB
For 64-bit Linux system:
- File name - R1Soft-EnterpriseEdition-linux64-3.18.2.zip
- File size - 348.44 MB
Extracting Files
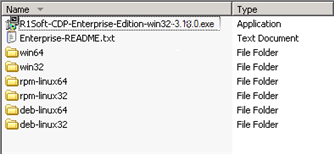
Extract all files from the archive. The installation package includes both the CDP Server installer for the selected platform and the Agent installers for all possible platforms. Specifically, the installation package includes the following files and folders:
- Enterprise-README.txt - Readme file with brief information on installation details.
- win32 - Folder with installation file for R1Soft CDP Enterprise Agent for 32-bit Windows systems. See more in Installing Agent on Windows.
- win64 - Folder with installation file for R1Soft CDP Enterprise Agent for 64-bit Windows systems. See more in Installing Agent on Windows.
- rmp-linux32 - Folder with rpm installation files for R1Soft CDP Enterprise Agent for 32-bit Linux operating systems. See more in Installing Agent on Linux.
- rmp-linux64 - Folder with rpm installation files for R1Soft CDP Enterprise Agent for 64-bit Linux operating systems. See more in Installing Agent on Linux.
- deb-linux32 - Folder with deb installation files for R1Soft CDP Enterprise Agent for 32-bit Linux operating systems. See more in Installing Agent on Linux.
- deb-linux64 - Folder with deb installation files for R1Soft CDP Enterprise Agent for 64-bit Linux operating systems. See more in Installing Agent on Linux.
Installing Enterprise Edition
The Server installer is a typical Windows installer application. Once you have obtained the CDP Enterprise Edition installation file, follow the instructions below to install CDP Server 3.18.2 Enterprise Edition. You can find the instructions on how to install CDP Agent 3.18.2 in Installing Agent on Windows and Installing Agent on Linux.
1. Log on to the Windows server as a member of the local Administrators group.
2. Navigate to the directory where you saved the CDP installation file. The installer will have the following attributes:
For a 32-bit system:
- File name - R1Soft-EnterpriseEdition-win32-3.18.2.zip
- File size - 287.32 MB
For a 64-bit system:
- File name - R1Soft-EnterpriseEdition-win64-3.18.2.zip
- File size - 305.67 MB
| See Also Checking Windows Bit Version - Instructions on how to determine whether a computer is running a 32-bit version or a 64-bit version of the Windows operating system. |
| Note The "Enterprise Edition" installer package is capable of installing both Server and Agent software. The "Enterprise Agent" installer package contains only the Agent software and is a much smaller package. |
| Note R1Soft products follow this format for version numbers: MAJOR.MINOR.MAINTENANCE. Pre-release downloads ALWAYS have a version number that has an ODD MINOR number, e.g., 3.7.5. Stable downloads ALWAYS have a version number with an EVEN MINOR number, e.g., 3.8.1. |
3. Extract the file from the archive. Execute the installer by clicking "Run."
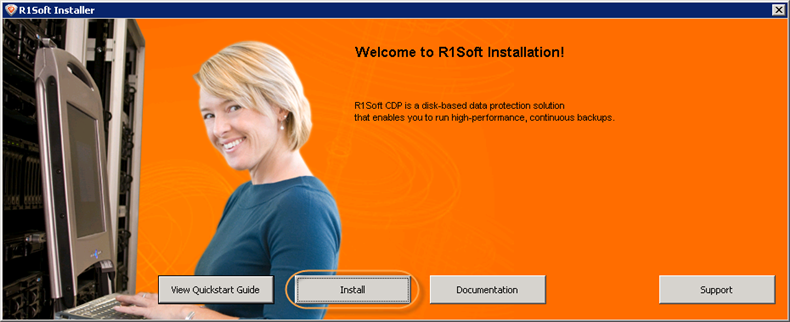
4. In the Welcome window, select a destination folder and click "Install."
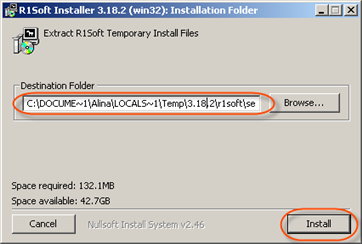
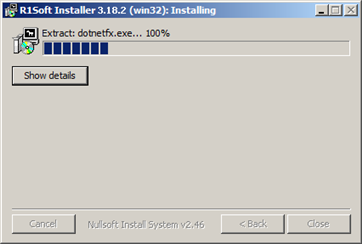
5. Wait while the files are extracted.

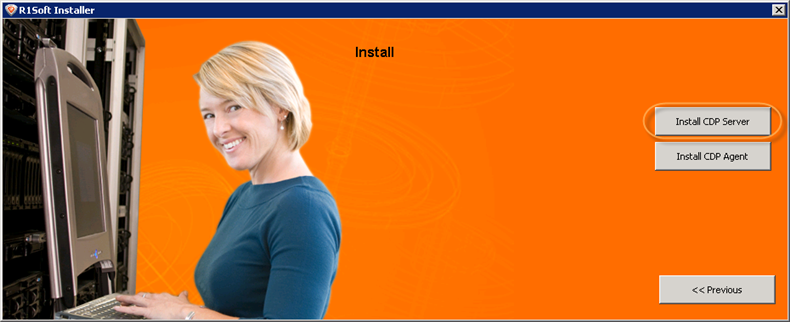
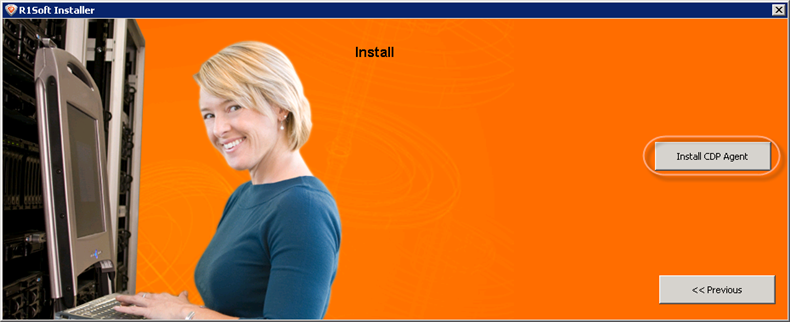
6. Click "Install" in the opened window.

7. Click "Install CDP Server."
8. If Microsoft .NET Framework 2.0 is not already installed on your PC, you will be asked to install it. Click "Yes."

If Microsoft .NET Framework 2.0 is installed, go to Step 13.
9. Click "Next" to start Microsoft .NET Framework 2.0 setup.

10. The next screen will display the "End-User License Agreement." Read it to the end, select the "I accept ..." checkbox, and then click "Install."

11. You will see a progress bar notifying you that the Setup is configuring the install.

Wait while the components are installed.

The system will inform you once the Setup is complete. Click "Finish" to close the ".NET Setup" window.

12. Once Microsoft .NET Framework is installed, you will be returned to Step 7, where you must choose between "Install CDP Server" and "Install CDP Agent." Click "Install CDP Server."
13. The R1Soft CDP Enterprise Edition Installer will open. Make sure that all other applications are closed and click "Next."
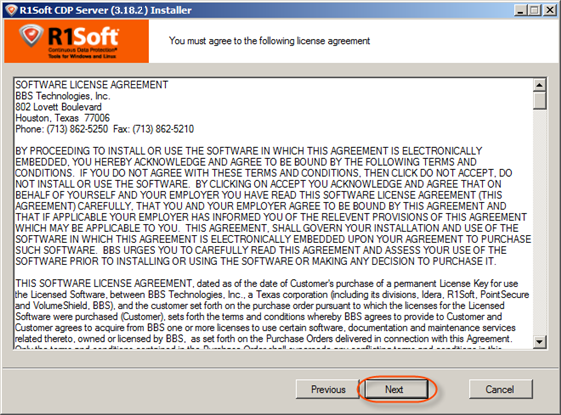
14. You must agree to the following license agreement. Read it to the end and click "Next" to accept.
15. The installer will check your system for possible problems. It is strongly recommended that all tests have a "Pass" status. You can repeat the tests by clicking the "Test" button. Click "Next" to go to the next screen.
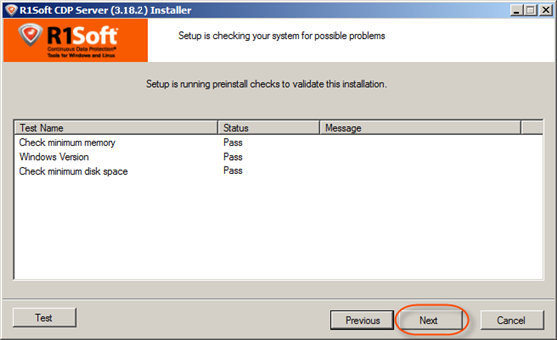
| Note You can find the full list of requirements in Enterprise Edition System Requirements. |
| Note If one or several requirements are not met, then an explanation will be displayed in the "Message" column. For such configurations, further installation is not recommended.  Possible values for the "Status" column are "Pass," "Not Recommended," and "Fail." If possible, correct the configuration and click "Test" again. |
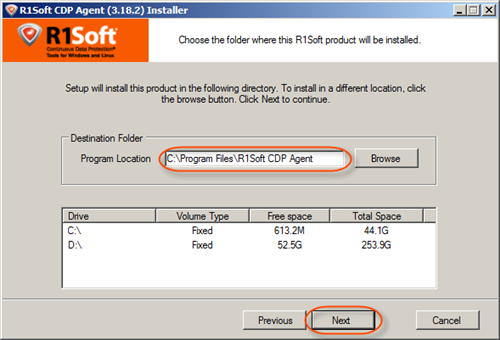
16. On the next screen, choose the installation directory for the server. It is safe to leave the default location untouched. However, you can install the server to another directory if, for example, you do not have enough free space on disk C.
Click "Next" to continue.

17. The "User Setup" window will load. You will be prompted to select the user you want to run the CDP Server as. By default, the "system account" is selected. It is safe to leave the default value untouched. The only exception is when you want to run the server on behalf of a Domain User that has local administrative rights. Make your selection and click "Next."
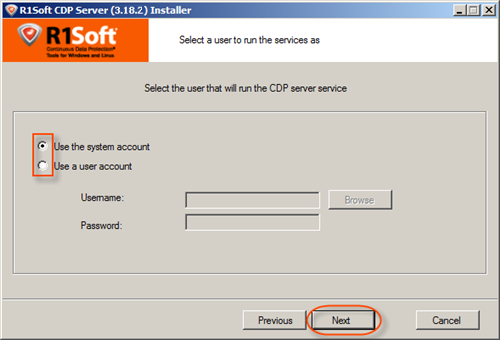
| Note If you are going to store Disk Safes at a network share, make sure the selected user has permission to write to the network share. See also: Error - Could Not Create Disk Safe Directory (CDP Server Knowledge Base). |
| Note The user account can be changed using the CDP Configuration Utility. |
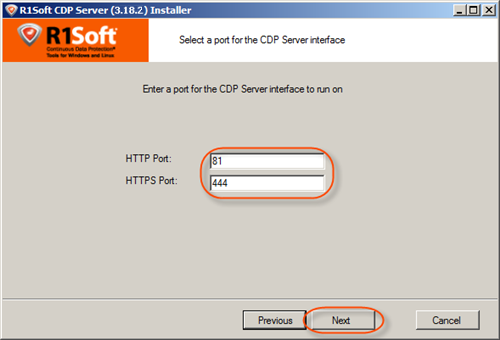
18. Verify HTTP and HTTPS ports for the CDP Server Interface to run on. Edit these fields if necessary. Click "Next."
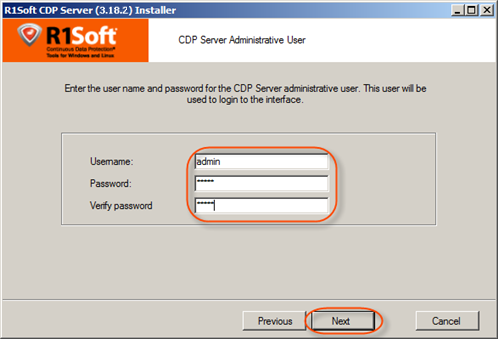
19. Set the Administrative User login credentials. The user name "admin" and the admin password that you select will be used to access the CDP Server via the Web Interface. The password characters will be replaced by asterisks (*) on the screen. Click "Next."
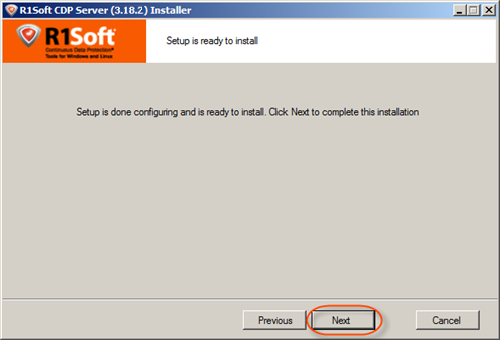
20. The configuration is complete. Click "Next" to start the installation process.
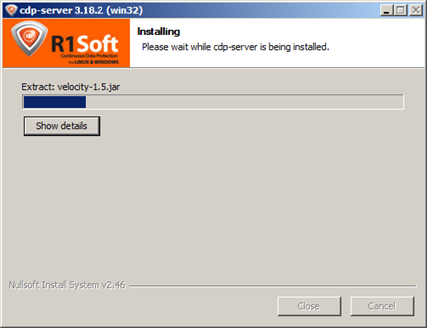
21. The installation process will start.
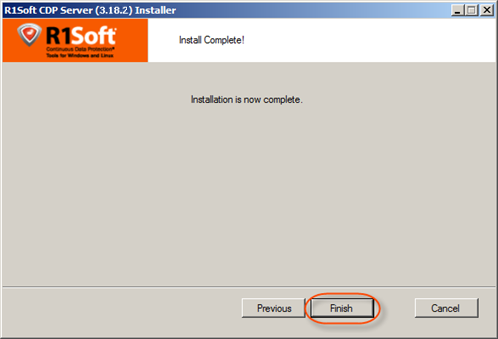
22. Your installation is now complete. Click "Finish."
Proceed to the next steps:
- Configuring Enterprise Edition on Windows
- Installing Agent on Windows
- Installing Agent on Linux
- Accessing Enterprise Edition Web Interface
- Activating CDP Enterprise Edition
- Adding the Server Key to Linux Agent
- Adding the Server Key to Windows Agent
- Configuring Heap Memory
- Configuring Product Features
There are two methods of installing CDP Enterprise Server:
- Automatic – Adding the R1Soft packages repository to the Aptitude or yum configuration when installing CDP Enterprise Server using apt-get or yum
- Manual – Downloading the R1Soft binary packages and installing them using dpkg or rpm
All four package managers – apt-get, yum, dpkg, and rpm – are Linux console applications. They can be started in a remote SSH session, in a GUI terminal window (Konsole in KDE, Gnome Terminal in Gnome, etc.), or on the Linux text console.
| Note PuTTY is the recommended SSH client. PuTTY allows you to paste text from the Windows clipboard by pressing the right mouse button. You can download PuTTY here: http://www.chiark.greenend.org.uk/~sgtatham/putty/download.html |
After the installation is complete, a reboot is not required.
Establish an SSH connection to the Linux server or log in on the Linux text console. You should either log in as root or obtain root permissions after logging in via the su or sudo command.
For detailed instructions for your Linux distribution, refer to the following pages:
- Installing Enterprise Edition on CentOS, RHE, and Fedora
- Installing Enterprise Edition on Debian and Ubuntu
You can use the "Enterprise Edition" or "Enterprise Agent" installer to install the CDP Agent 3.18.2 Enterprise Edition. The Agent installer is a typical Windows installer application. Once you have obtained the CDP Enterprise Agent installation file, follow the instructions below to install CDP Agent 3.18.2 Enterprise Edition.
1. Log on to the Windows server as a member of the local Administrators group.
| Notice The user account must have "Log On as Service" permission to start the CDP Agent service automatically. |
2. Extract the files from the archive. Navigate to the directory where you saved the "Enterprise Edition" or "Enterprise Agent" installation file. The Agent installer will have the following attributes:
For 32-bit system:
- File name - R1Soft-EnterpriseAgent-win32-3.18.2.zip
- File size - 29.52 MB
For 64-bit system:
- File name - R1Soft-EnterpriseAgent-win64-3.18.2.zip
- File size - 51.3 MB
| Note The "Enterprise Edition" installer package is capable of installing both Server and Agent software. The "Enterprise Agent" installer package contains only the Agent software and is a much smaller package. |
| Note R1Soft products follow this format for version numbers: MAJOR.MINOR.MAINTENANCE. Pre-release downloads ALWAYS have a version number that has an ODD MINOR number, e.g., 3.7.0. Stable downloads ALWAYS have a version number with an EVEN MINOR number, e.g., 3.8.1. |
3. Execute the installer by clicking "Run."
4. Verify the install destination and click on the "Install" button.

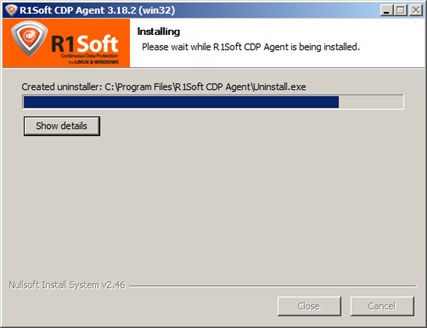
5. Wait while the files are extracted.
6. Click "Install" in the opened window.
7. Click "Install CDP Agent."
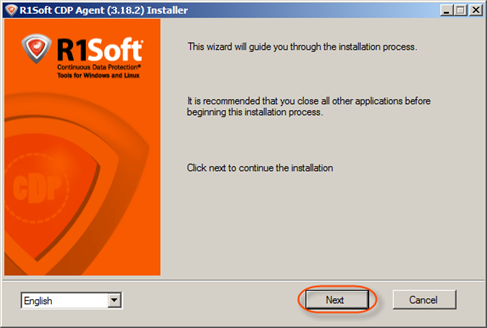
8. The R1Soft CDP Agent Enterprise Edition Installer will open. Make sure all other applications are closed and click "Next."

9. You must agree to the following license agreement. Read it to the end and click "Next" to accept.

10. The installer will check your system for possible problems. It is strongly recommended that all tests have a "Pass" status. You can repeat the tests by clicking the "Test" button. Click "Next" to go to the next screen.

| Note You can find the full list of requirements here: http://www.r1soft.com/windows-cdp/cdp-enterprise-edition/sys-req/. |
| Note If one or several requirements are not met, then an explanation will be displayed in the "Message" column. For such configurations, further installation is not recommended. Possible values for the "Status" column are "Pass," "Not Recommended," and "Fail." If possible, correct the configuration and click "Test" again. |
11. On the next screen, choose the installation directory for the Agent. It is safe to leave the default location untouched. However, you can install the Agent to another directory if, for example, you do not have enough free space on disk C. Click "Next" to continue.
12. The configuration is complete. Click "Next" to start the installation process.

13. The installation process will start.
14. To finish the installation, you will need to reboot your PC. Click "Yes" in the displayed window.
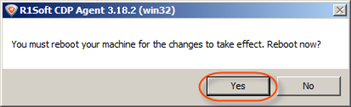
15. After the machine reboots, the installation is complete.
Proceed to the next steps:
- Installing Enterprise Edition on Windows
- Installing Enterprise Edition on Linux
- Adding the Server Key to Windows Agent
There are two (2) methods of installing CDP Enterprise Server and Agent:
- Automatic -- Adding the R1Soft packages repository to the Aptitude or yum configuration when installing Agent using apt-get or yum
- Manual -- Downloading the R1Soft binary packages and installing them using dpkg or rpm
All four package managers – apt-get, yum, dpkg, and rpm – are Linux console applications. They can be started in a remote SSH session, in a GUI terminal window (Konsole in KDE, Gnome Terminal in Gnome, etc.), or on the Linux text console.
| Note PuTTY is the recommended SSH client. PuTTY allows you to paste the text from the Windows clipboard by pressing the right mouse button. You can download PuTTY here: http://www.chiark.greenend.org.uk/~sgtatham/putty/download.html |
After the installation is complete, a reboot is not required.
Establish an SSH connection to the Linux server or log in on the Linux text console. You should either log in as "root" or obtain root permissions after logging in via the su or sudo command.
For detailed instructions for your Linux distribution, refer to the following pages:
- [Installing Agent on CentOS, RHE, and Fedora]
- Installing Agent on Debian and Ubuntu
With CDP properly installed, you can access the administration Interface by opening a Web browser and typing in the Host Name or IP address of the CDP Server.
Accessing CDP from Local Machine
You can connect to the CDP Server Web Interface from the computer where it is installed. Type the following address in a browser address bar:

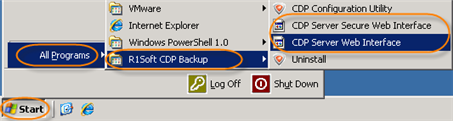
You can also access the CDP Server Web Interface from the Start Menu.
For example, Start ![]() Programs/All Programs
Programs/All Programs ![]() R1Soft CDP Backup
R1Soft CDP Backup ![]() CDP Server Secure Web Interface or CDP Server Web Interface.
CDP Server Secure Web Interface or CDP Server Web Interface.
| Notice The Start menu folder can be different if the User has chosen another name during the CDP installation. |
Accessing CDP from Internet/LAN
To connect to the CDP Server Web Interface from any computer connected to Internet/LAN, follow the instructions below.
In the address bar of the browser, type the IP address (Host Name) of the CDP Server. Typically, it is same as the IP address of the computer. Example:
| Tip In Windows, you can find out the IP address of the computer by following these instructions. Click "Start," select "Run" (in some versions), type "cmd," type "ipconfig," and press <Enter>. IP address of your PC will be displayed among the other configuration parameters. |
| Tip In Linux, type the "ifconfig" command to find out the IP address of the machine. |
Using Secure Connection
You can use the following connection types to CDP Web Interface:
- CDP Server Web Interface - Uses HTTP protocol.
- CDP Server Secure Web Interface - Uses encrypted (SSL) HTTPS connections.
CDP Server Secure Web Interface uses encrypted (SSL) HTTPS connections. To access the CDP Server securely, add "https://" before the IP address (Host Name) of the CDP Server. See also: Running CDP over SSL (HTTPS).

CDP Server Web Interface uses HTTP protocol.
| Note By default, HTTP and SSL are enabled. You can configure these settings in Configuration |
Logging in to the CDP Server
Once you have established a connection to the CDP Server, you will be prompted for a Username and Password.
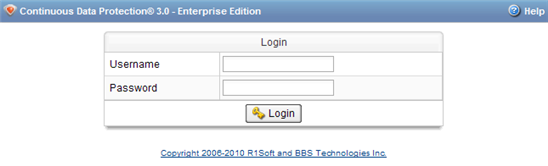
Type in "admin" as the Username and type in the Password you specified during installation. Click on "Login."
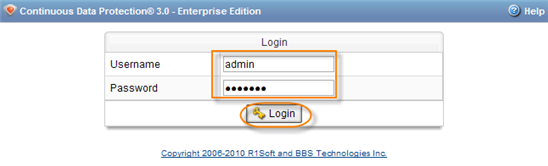
Proceed to the next step: Activating CDP Enterprise Edition.
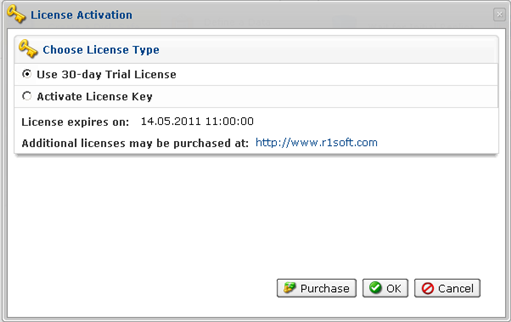
Activating the Trial License
After the first login to the CDP Server via the Web Interface, you should activate the Trial License. Follow the instructions below.
1. After your first login, the "License Activation" dialog is displayed. It allows you to select one of the following options:
- Use 30-day Trial License
- Activate License Key
2. To active the Trial License, choose the first option and press "OK."
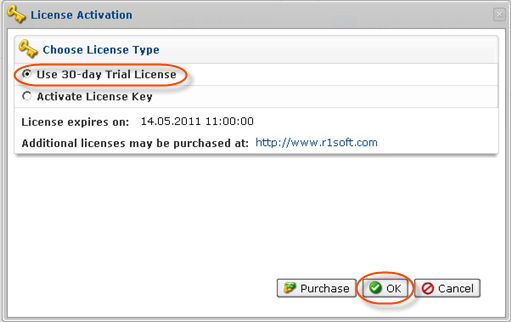
Your Trial Enterprise Edition License expires in 30 days after activation.