Follow the instructions outlined below to protect one or more MS SQL Server instance per Server.
Configuring Disk Safe Tips
1. Make sure all file systems for databases are available for replication.
If any file systems for databases are not protected by Disk Safe settings and Devices found, then the system displays an alert message.
2. Ensure that the SQL Server VSS Writer is included in the snapshot.
Creating and Running a Policy
1. In the "Policy Settings" tab, select the Server where your MS SQL Server is installed.

2. In the "SQL Server" tab, click on the "Discover Instances" button to look for SQL instances on the Server.

| Note You can see the following message in those cases when no Instances were found.
|

3. The system connects to the MS SQL Server and obtains a list of databases and corresponding .mdf/.ldf files. The activity can be seen from the "Processing" message.
_English.png%3Fversion=1&modificationDate=1351170703000)
4. When the Processing is done you can add individual instances for replication by selecting them from the drop-down menu.

5. Then click the "Add" button.

6. Once the Instances have been added you can see it in this window below.

| Note The "Delete" icon can be used hereafter to delete Instance.
|

7. Alternatively, check the "Backup All Databases" option as shown below. In this case all databases will be discovered and backed up automatically.

| Reference SQL Server databases use two types of files:
|
8. Go to the "Advanced Policy Settings" tab.
- Multi-Volume Snapshot - This option can be useful if the MS SQL Server has files across more than one Device. The check-box is hidden on Linux policies and un-checked by default on new and upgraded Windows policies.
| Note If the SQL Server has files across more than one device, and the "Multi-Volume Snapshot" option is not selected, then the system displays an alert message. |

9. Once the database instances have been added to the Policy, click "Create".

| Note You can also click the "Create and run" button. In this case your Policy will be created and ran immediately.
|

10. The Policy will be displayed in the list.

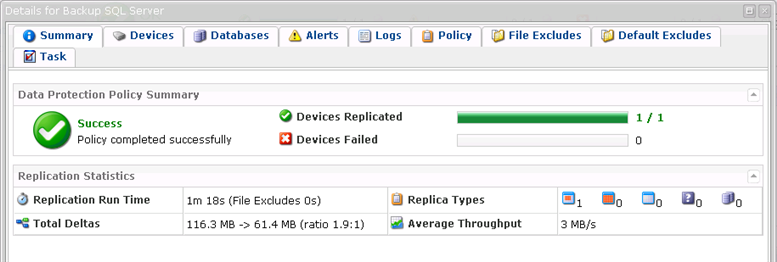
11. Once the Policy has been started and successfully completed, you will be able to view a Task Summary that looks like this:
See also Restore an MS SQL Server to the original location.