Preparations
Configuring Server with LVM
For testing purposes, create a Server with a complex LVM layout with five (5) different disks:

The second volume group has to be manually created. Linux install-time partitioning tools put LVM physical volumes on partitions, not raw devices.
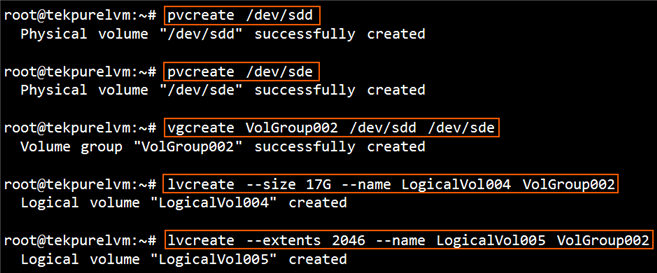
- Create physical volumes, i.e., mark already created hard disk partitions for use as a part of LVM. If the swap partition was not an LVM volume, then do not run "pvcreate" on it. The example below shows how to run the pvcreate command on /dev/hda1: # pvcreate /dev/sdd # pvcreate /dev/sde
- Create a Volume Group with the same name as on the backed up Server. By default, CentOS installer names the first volume group "VolGroup00" as in the example below:
- Create the logical volume (LVM) for swap space. This volume should have the same name as it did on the backed up Server. In this example, it is LogVol00. Execute the following command:
The following screen-shot displays all commands for the second volume group:
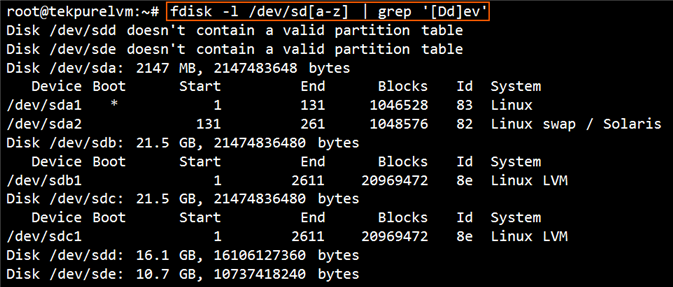
The following screen-shot shows how the example layout looks in fdisk. /dev/sdd and /dev/sde do not have partition tables, but LVM can still use them as physical volumes.
Creating a Disk Safe
Create a Disk Safe. See Create Disk Safes.

Creating and Running a Policy
1. Create a basic Policy for the new Disk Safe. See Create policies.

2. Then run the created Policy. See Run policies.
Bare-Metal Restore Process
Follow the instructions below to start the Bare-Metal Restore with LVM.
| Note The process is the same for all Boot methods:
|
Step 1: Boot from Live CD or PXE Network Boot
If you are restoring your system partition (e.g. /, /boot, /bin, /lib, etc.), boot physical or virtual machine from one of the available Server Backup disaster recovery media options (Live CD or PXE Network Boot.)
For more information, see:
Step 2: Initiate a Bare-Metal Restore from "Recovery Points"
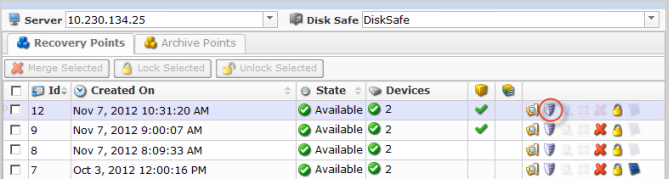
1. Click on "Recovery Points" in the Main Menu to open the "Recovery Points" screen.
2. Select a Server from the drop-down menu located on the "Recovery Points" list toolbar.
Select a Disk Safe from the drop-down menu located on the "Recovery Points" list toolbar.
| Tip Alternatively, you can click on "Servers" in the main menu, then select the "Disk Safes" tab in the bottom pane, and then click on the "Recovery Points" icon for the Disk Safe to access the Recovery Points list. |
3. In the "Recovery Points" list, click on the "Bare-Metal Restore" icon in the "Actions" column for the Recovery Point from which you are going to restore.
| Tip To find a Recovery Point, you can use the Basic and Advanced List Filters. See Customize the Recovery Points list. |
4. The "Bare-Metal Restore" window opens.
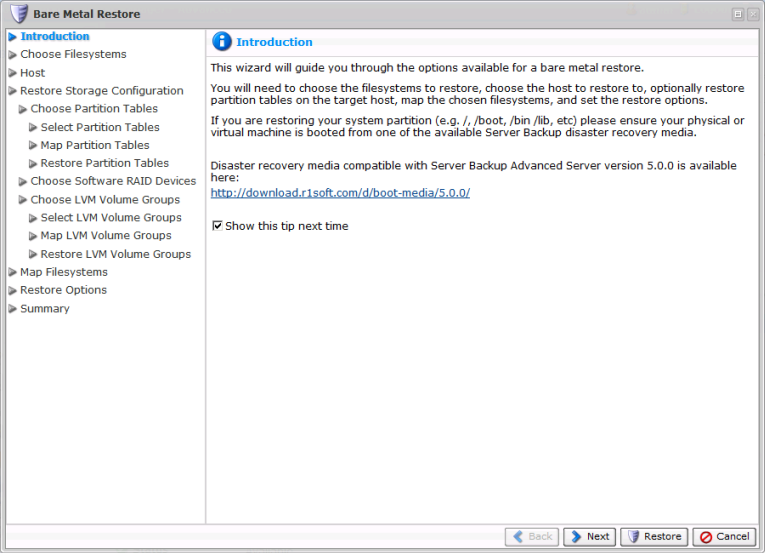
Look through the information on the Introduction screen and click "Next."

Step 3: Choose Filesystems
| Note Hereinafter on this page there are some changes. Please refer to this link: [Using Bare-Metal Restore Device Auto-Mapping] explaining the new feature. |
On the next page, select the filesystem you want to restore. All available filesystems are listed. In our example, we select the /, /boot, /home, /home/user1, and /home/user2 filesystems.
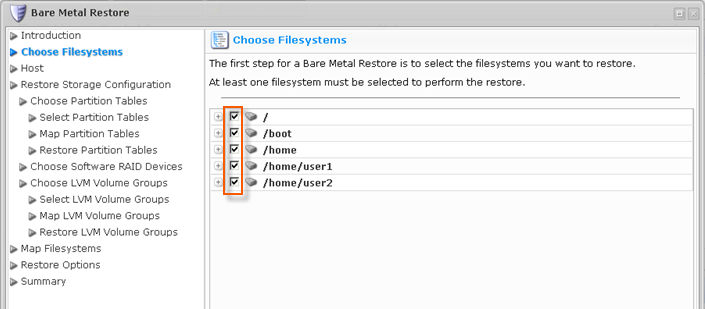
Click "Next" to proceed to the following step.
Step 4: Select Host
On the next screen, select the "Restore to Alternate Host Name/IP" option. Enter the IP address and port of your Live CD or PXE Boot environment.
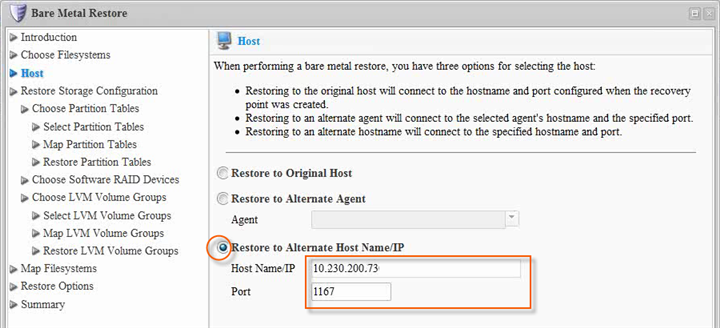
Click "Next" to proceed to the following step.
Step 5: Define Restore Storage Configuration
On the "Restore Storage Configuration" screen, choose the "Select Storage Configuration to Restore" option.
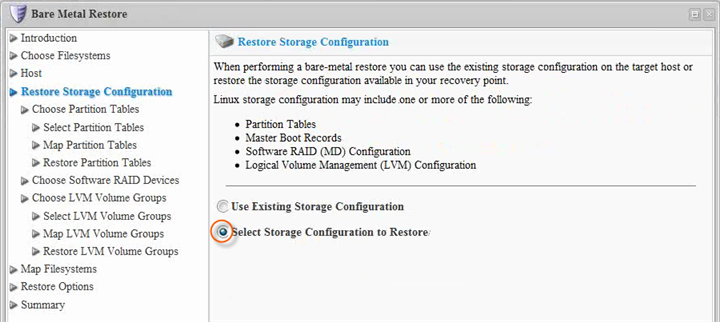
Click "Next" to proceed to the following step.
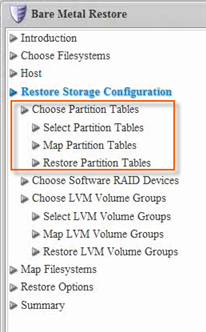
5.1 Choose Partition Tables
Partition tables should be restored before restoring LVM Volume Groups. Go through all of the Partition Tables steps before moving on to LVM Volume Groups:
- Choose Partition Tables
- Select Partition Tables
- Map Partition Tables
- Restore Partition Tables
On the "Choose Partition Tables" screen, choose the "Select Partition Tables to Restore" to pick partition tables from the Recovery Point to restore to the target host.
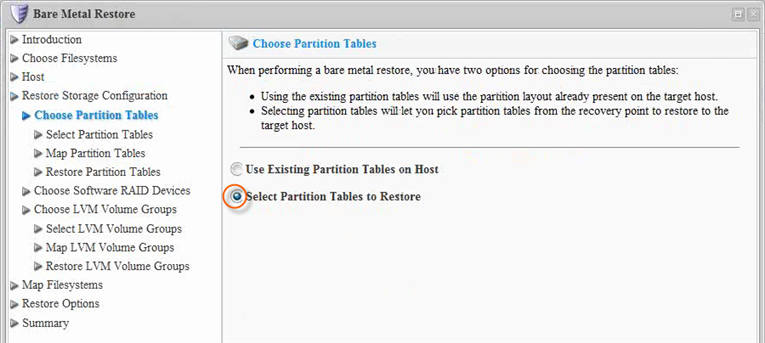
Click "Next" to proceed to the following step.
Then choose the appropriate partition table layout(s) for the filesystems you want to restore. At least one partition table check-box must be selected.
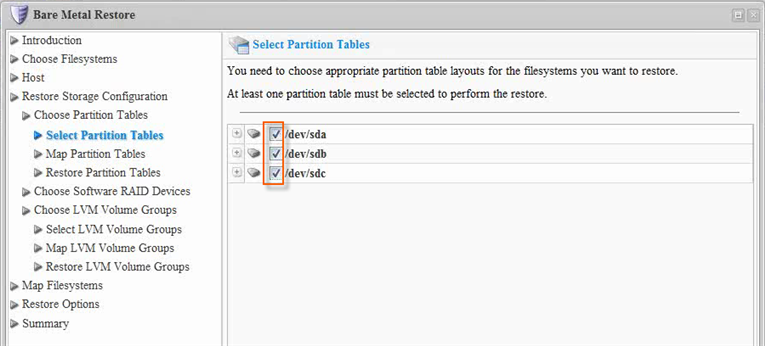
| Tip Click the plus-sign to see the details of a partition table.
The following information is available:
|
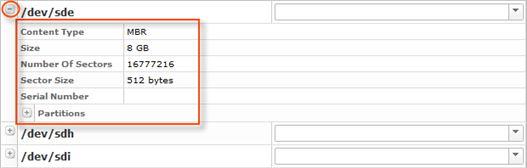
Click "Next" to proceed to the following step.
After choosing partition tables to restore, you need to map the partition tables to the disks on the target host. Map all the partition tables selected.
| Notice The target disk must be large enough to hold the partition table, and each target disk can only be selected once. |
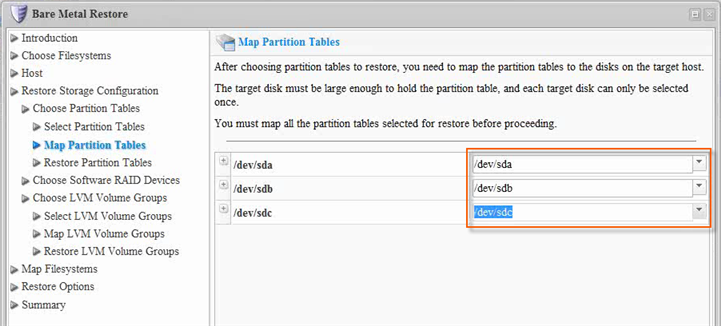
Click "Next" to proceed to the following step.
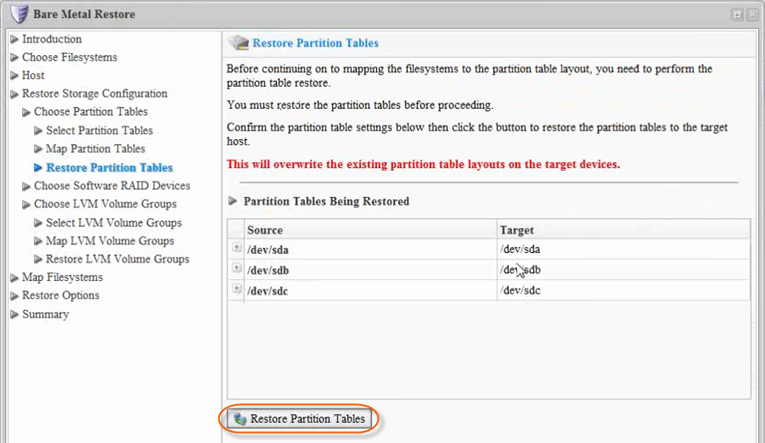
On the next screen, click on the "Restore Partition Tables" button.
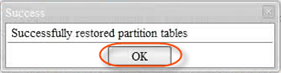
Then you should receive the "Successfully Restored Partition Tables" message. Click "OK."
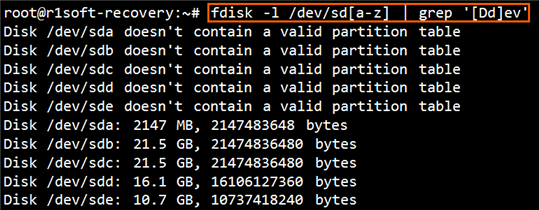
Output from fdisk before partition table restore:
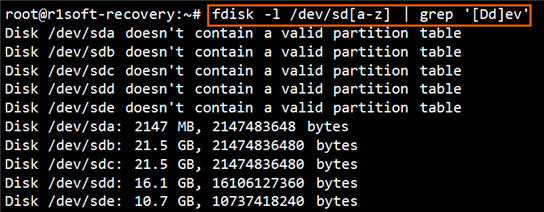
Output from fdisk after partition table restore (should match original):
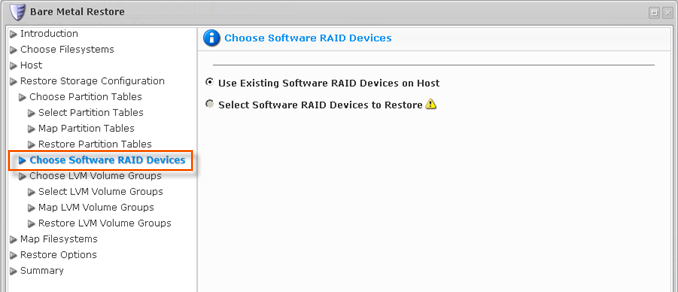
5.2 Choose Software RAID Devices
In our example, there are no Software RAID devices to restore.
If you have any Software RAID devices to restore, they should be restored prior to LVM Volume Groups. Go through all of the Software RAID steps before moving on to LVM Volume Groups.
5.3 Choose LVM Volume Groups
Selecting LVM Volume Groups is just like choosing Software RAID devices. On "Choose LVM Volume Groups," choose the "Select LVM Vlume Groups to Restore" option.
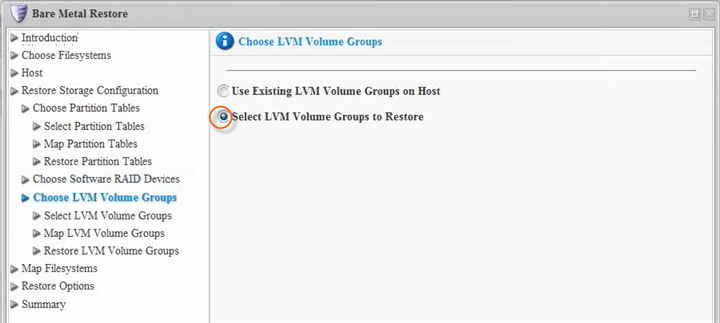
Click the "Next" button.

Choose LVM Volume Groups on the "Select LVM Volume Groups" screen.
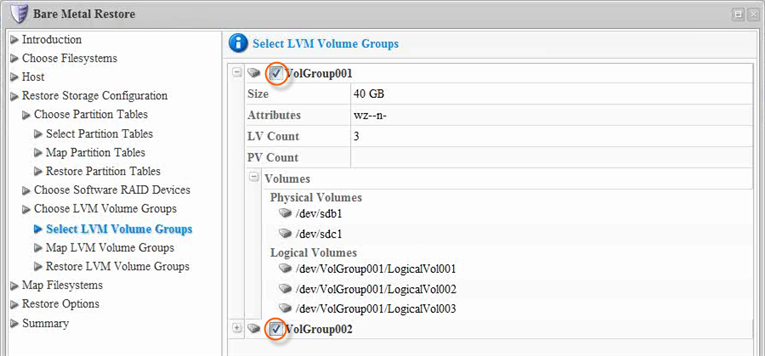
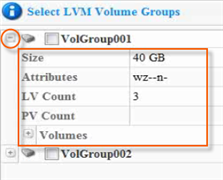
| Tip Click on the plus sign to see the details of a Volume Group.
The following information is available:
|
Click the "Next" button.
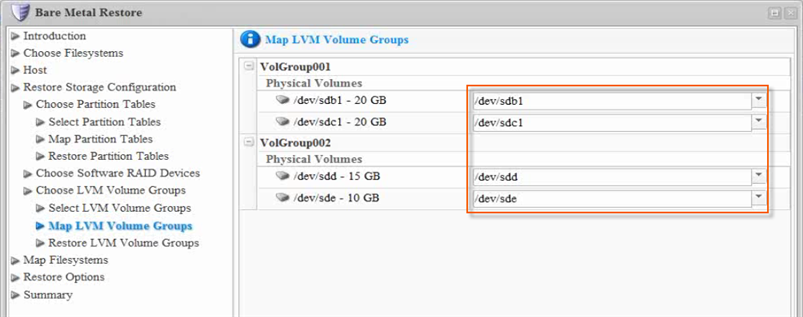
Mapping LVM Volume Groups is similar to mapping Software RAID devices, but there are only physical volumes instead of active/spare members. Devices already restored to /dev/sda, /dev/sdb, etc., are pruned from the available devices list.
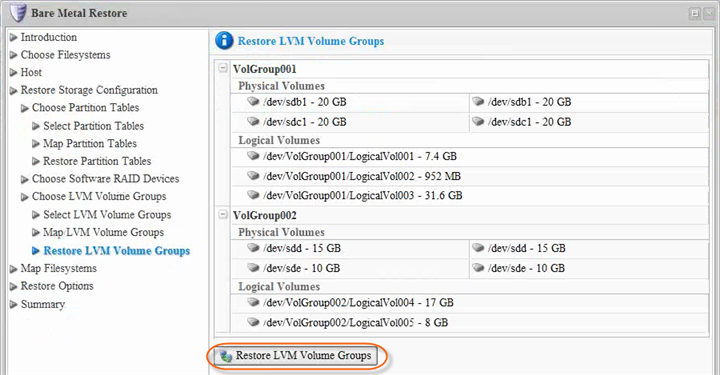
When all the members are mapped, clicking the "Restore LVM Volume Groups" button will launch the restore.
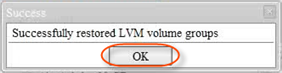
The "Successfully restored LVM volume groups" message appears. Click "OK."
When the restore completes successfully, the LVM logical volumes will be available for mapping the selected filesystems.
Step 6: Map Filesystems
Map filesystems in the Recovery Point to logical volumes as a restore destination.
Enter the new Logical Volume as the destination, for example, /dev/mynew_vg/vol01.

You are provided a table that allows you to map the chosen Partition Tables to physical Disks on the Target Server. You can see as many lines in the table as the number of Partition Tables selected for restore. Each Partition Table must be mapped to a physical Disk on the Target Server before proceeding.
| Notice Make sure that the partition for /boot is big enough. |
| Tip Click the plus-sign to see the details filesystems. |
After selecting the Disks, click on "Next" to proceed to the next page.
Make sure the "Reboot after restore" box is unchecked.
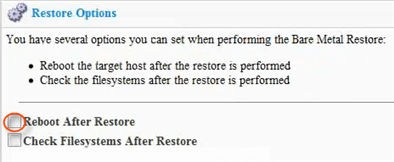
Click "Next" to proceed to the following step.
On the "Summary" page, you will need to confirm the selected Bare-Metal Restore options. Each selected filesystem is listed, along with the name of the target device to which it is being mapped.
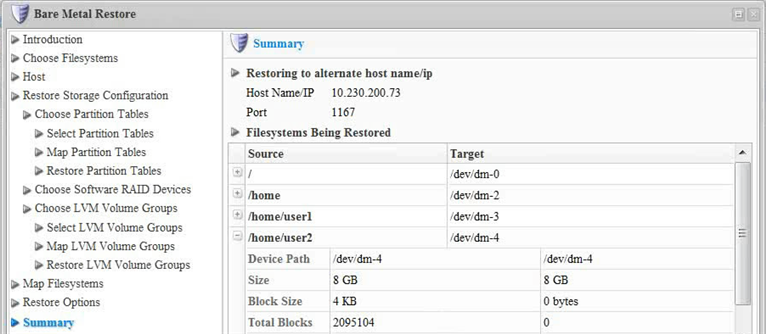
Click "Restore" to start the Bare-Metal Restore task.
The data Restore is initiated. Click "OK" in the notification pop-up.
| Tip The Task results can be sent via email as a Report. See Reporting. |
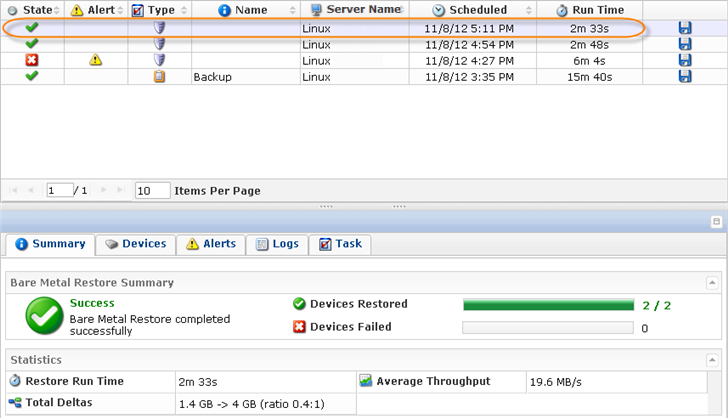
The Restore process starts and can take a while. You can go to the "Task History" screen to observe the task progress. See Access task history.
The Task History page displays the State, Alert, Type, Progress Percentage, and the Started Time Stamp of the Bare-Metal Restore process.
When the process is complete, you can reboot the Server you just restored by pressing <Ctrl><Alt><Del> or by executing the reboot command in the root shell.
| Note Make sure you eject the Disk from the CD-ROM drive so that the Server will boot from the hard Disk.
If the Disk you used for your Bare-Metal Restore is larger than the Disk you backed up previously, the free space on the new Disk will remain free. You can create a new Partition in this space. |
Results can also be verified at the command line via the "ls" command.
Before restoring LVM devices:

After restoring LVM devices:
