Follow the instructions below to access Recovery Points via CDP interface.
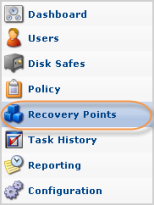
1. Click on "Recovery Points" in the Main Menu to open the "Recovery Points" window.
| Standard Edition | Enterprise Edition | Advanced Edition |
|---|---|---|
 |
 |
 |
| Tip You can access the "Recovery Points" window by manually appending the /RecoveryPoints/ folder to the CDP Server address in the browser address bar. Example: http://10.61.200.31/RecoveryPoints/. Note that the address is case sensitive.  |
2. Enterprise Edition: In the "Recovery Points" list, select an Agent from the drop-down menu located on the "Recovery Points" list toolbar.
| Enterprise Edition |  |
|---|
3. Select a Disk Safe from the drop-down menu located on the "Recovery Points" list toolbar.
| Standard, Advanced Edition |  |
|---|---|
| Enterprise Edition |  |
The "Recovery Points" window is divided into the following areas:
- Recovery Points Menu - Provides access to the actions which relate to customizing the "Recovery Point" list.
- Recovery Points List - The Recovery Points added to the system are displayed in this area.
- Details Pane- After you select an item in the list, its details are displayed in this area.

Recovery Point Menu
The following Recovery Point menu buttons are available:
- Basic List Filter - Allows you to customize the view of the "Recovery Points" list by applying the minimum range (most commonly used) of filter criteria. See Customizing the Recovery Points List.
- Show All - Cancels filter settings and shows all records in the "Recovery Points" list.

"Recovery Point" List
The "Recovery Point" list provides information about Recovery Points in a grid.
| Tip You have a possibility to organize information, such as filtering out the items you do not need to see. You can also sort items, limit the number of items displayed per page, and specify which columns you want to display. See Customizing the Recovery Points List. |
| Tip To see the name of the column heading, hover the mouse pointer over the column heading, without clicking it. The title will be displayed in a yellow tooltip.  |
Columns
- Checkbox - Allows you to select the item in the list.
- ID - Identification number generated by the system.
- Created On - Date and time when the Recovery Point was created.
- State - Recovery Point state (Available, Locked, Merged, etc.)
- Devices - Devices that where replicated to the Recovery Point.
- Actions - This column provides access to actions available for the selected Recovery Point.
- Browse - You can view the replicated files and folders and select the ones to restore. See Browsing Recovery Points, Restoring Files.
- Bare Metal Restore - You can open Bare Metal Restore Wizard to set the restore options.
- Lock - You can protect the Recovery Point from merging. See Locking Recovery Points.
List Buttons
The buttons allow you to work with one or several items selected in the "Recovery Points" list.
- Disk Safe - Disk Safe where the Recovery Point is located.
- Agent (Enterprise Edition) - The assigned Agent.
- Merge Selected - Once one or several Recovery Points are checked in the list, this button allows you to merge them. See Merging Recovery Points.
- Lock Selected - Once one or several unlocked Recovery points are checked in the list, this button allows you to lock them. See Locking Recovery Points.
- Unlock Selected - Once one or several locked Recovery Points are checked in the list, this button allows you to unlock them.
Pages Navigation
The Pages Navigation pane allows you to divide the Recovery Points into pages by specifying the desired number of items per page. The Pages Navigation pane provides buttons to navigate from one page to another.
- Arrows - Turns over pages.
- First - Opens the fist page.
- Previous - Opens the previous page.
- Next - Opens the next page.
- Last - Opens the last page.
- Page Number - Field where to type in the page number. Press <Enter> to go to the required page. The total number of the existing pages is shown on the pane.
- Items Per Page - Used to define how many items to display per page in the "Recovery Points" list. The system remembers your settings. Unless you change this settings, you see 10 items per page. If you want to see more/less items per page, you can change the number and press <Enter>. The maximum number of items per page is 25.
Details Pane
This pane provides detailed information about the Recovery Point selected in the list. Most of the presented data is the same as the data shown in the "Recovery Point" list columns.
Details Tab
| Standard, Advanced Edition | 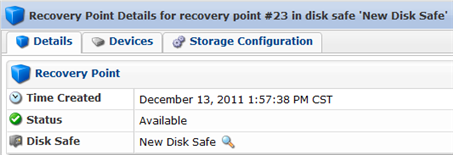 |
|---|---|
| Enterprise Edition | 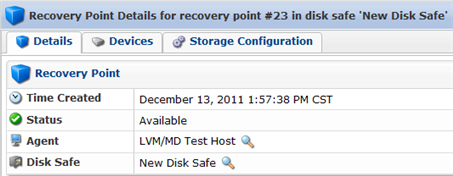 |
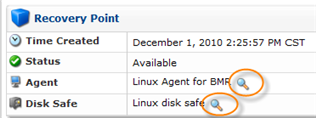
- Time Created - Date and time when the Recovery Point is created.
- Status - Shows a state of the Recovery Point (Available, Locked, Merged, etc.)
- Disk Safe - Disk Safe where the Recovery Point is located.
- Agent (Enterprise Edition) - The assigned Agent.

Tip
You can collapse/expand the details of the Disk Safe (or Agent) by clicking on the "Details" icon.
Devices Tab

This table displays information about the replicated devices in the columns:
- State - Graphically indicates the Device state (Incomplete, Complete, Error, Merged, etc.)
- Type - Last Synch Type (Initial Replica, CDP Replication or Block Scan). For more information, see 3 Stages of CDP 3 Replication (Technical Papers).
- Mount Point
- Size - The measuring characteristic of Device showing how large it is, in other words, what space is available on the Device. Example: 8.0 GB.
- Content Type - The file system created on the Device. Example: NTFS.
- Block Size - A file system property which indicates a nominal length of a block in the Device. Example: 4.0 KB.
- Disk Usage
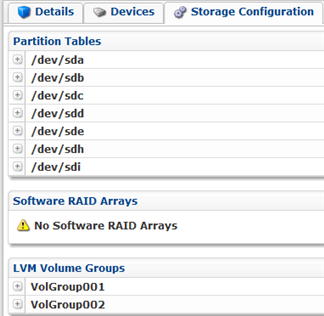
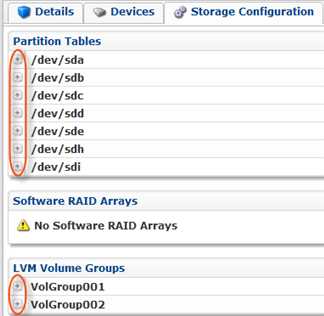
- Partition Tables - The list of partition tables.
- Software RAID - The list of Software RAID (for Linux only).
- LVM - The list of LVM(for Linux only).
Tip
Click on the plus sign to see the details.