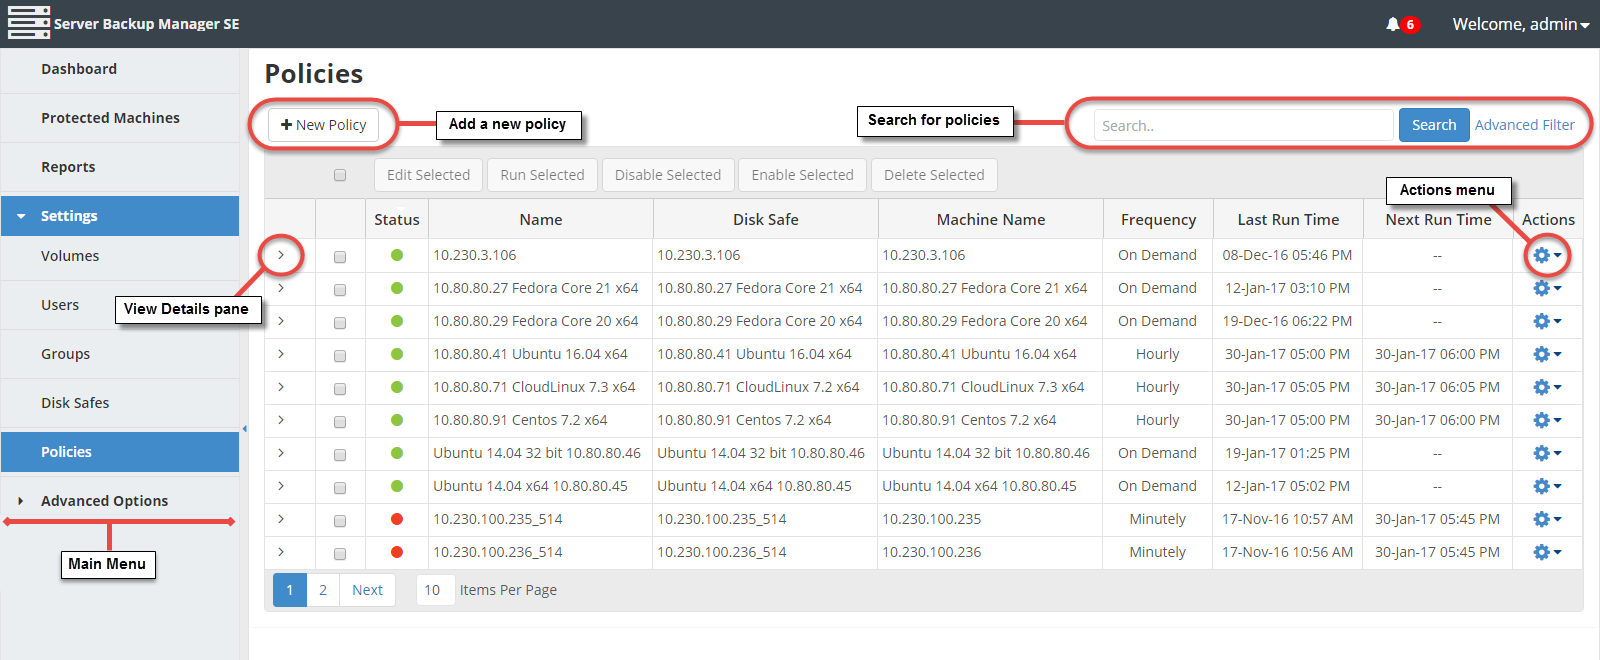
The Policies page in Server Backup Manager allows you to view, add, and edit policies. You can access all of the functions you need to manage your policies by clicking Settings and then *Policies *in the Main menu. You can also access the Policies area directly by adding /Policy/ to the Backup Manager address in your Web browser address bar, such as http://10.61.200.31/Policy/. Note that the address is case sensitive.
From the Policies page, you can:
- Add a policy using the + New Policy button.
- Click the Actions icon to display a list of actions that can be completed directly from the Policies screen, such as editing the policy, running the policy on demand, or disabling the policy.
- Search for specific policies or filter the displayed policies using advanced search criteria.
- View a list of the policies added to the system.
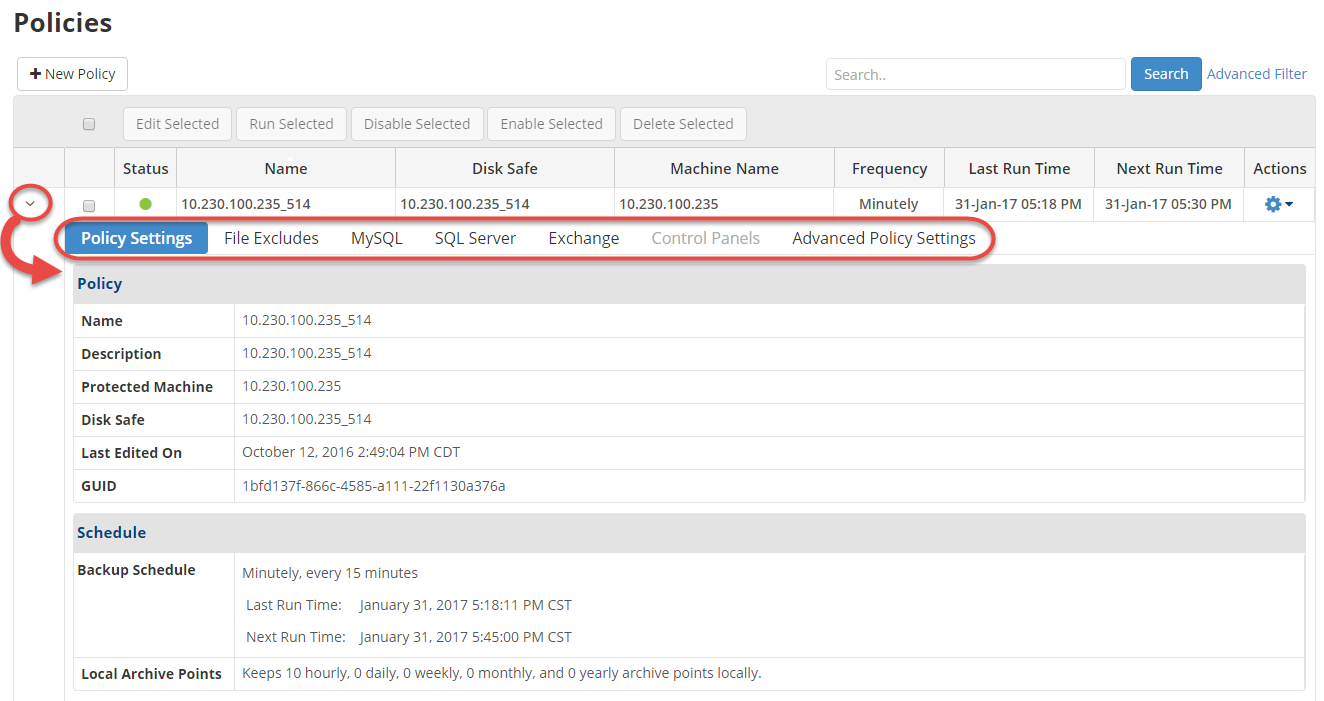
- Click a policy's corresponding > icon to access additional details for a specific policy without leaving the Policies page.
- Use simple, one-step navigation to access other areas of Server Backup Manager from the Main Menu.

You can also access the Policies list associated with the selected protected machine using the Policies tab of the Protected Machine Details Pane. This screen provides the same functionality as the main Policies screen, including policy creation. See more information in Access Protected Machines.
Using the Policies page
Several options on the Policies page allow you to:
- Add a policy. Add a new policy to the system by clicking the + New Policy button. When you click this button, the Create New Policy window displays, where you can add the policy details. For more information about adding a policy, see Create policies.
- Perform a basic search for policies. You can perform a basic search for any available policy by entering the search criteria in the Search field and clicking the Search button.
- Apply advanced filters to the Policies list. You can further customize the view of the Policies list and apply all possible advanced filter criteria. For more information about advanced search filters, see Customize the Policies listsee .
- Clear all filters. Appears only when a filter is in use. To cancel filter settings and show all records in the Policies list, click the Clear Filter button.
Policies List
The Policies list provides information about the policies in the grid.
Columns
- Status. Graphically indicates the Policy status ("Enabled" or "Disabled"). If the icon is green, then the Policy is enabled. The red icon is used for disabled Policies.
- Name. The unique name of the Policy.
- Disk Safe. The selected Disk Safe to save the replicated data in.
- Machine Name. Shows the name of the protected machine.
- Frequency. Recurrence selected for running the Policy (On Demand, Minutely, Hourly, Daily, Weekly, Monthly, or Yearly).
- Last Run Time. Date and time when the Policy was most recently started.
- Next Run Time. Date and time when the Policy will run next, according to the schedule.
- Actions icon. Click this icon to display the actions available for the Policy.
- Edit Policy. See Edit policies.
- Run Now. See Run policies.
- Verify Disk Safe Now. See Run Disk Safe verification.
- Disable. See Disable policies.
- Delete Policy. See Delete policies.
List Buttons
The buttons provide you control over one or several items selected in the Policies list.
- Select All/Clear All. Click this check box to select all of the policies. Click it again to clear all selected check boxes.
- Edit Selected. Allows you to edit the settings of several selected Policies simultaneously. See Edit policies.
- Run Selected. Allows you to run several selected Policies simultaneously. See Run policies.
- Disable Selected. Once one or several enabled Policies are checked in the list, this button allows you to disable them simultaneously. See Disable policies.
- Enable Selected. Once one or several disabled Policies are checked in the list, this button allows you to enable them simultaneously.
- Delete Selected. Once one or several Policies are checked in the list, this button allows you to permanently remove them from the system. See Delete policies.
Page Navigation
The Page Navigation pane allows you to divide the Policies list into pages by specifying a number of items per page. Various buttons and fields can be used to navigate from one page to another.
- First. Opens the first page.
- Previous. Opens the previous page.
- Next. Opens the next page.
- Last. Opens the last page.
- Items Per Page. Displays the number of items per page that you want to appear in the Policies list. SBM remembers your settings. By default, SBM displays 10 items per page. If you want to see a different number of items per page, type the appropriate number, and then press <Enter>. The maximum number of items per page is 25.
Details Pane
This pane provides you with detailed information about the Policy selected in the list. The following tabs are available:
- Policy Settings
- File Excludes
- MySQL
- SQL Server
- Exchange
- Control Panels
- Advanced Policy Settings

Policy Settings Tab
Most of the presented data is the same as the data shown in the Policies list columns. The following information is available:
Policy
- Name - The unique name of the Policy.
- Description - Additional information about the Policy. This field is also unique.
- Protected Machine - The name of the protected machine.
- Disk Safe - The name of the assigned Disk Safe.
- Last Edited On - The date and time when the Policy was created or last edited.
- Errors - Displays a message if any errors appear.
- GUID - Identification number.
Schedule
- Backup Schedule - Displays the backup schedule as well as the last run time and next run time.
- Retention Points - Displays the backup retention policy.
File Excludes Tab
Displays the "Files Excludes" rules for the selected Policy.
Columns:
- Exclude Type - Graphically shows the type of Exclude rule:
- Selected - This type means files and folders were selected to exclude in the "File and Folder Excludes" tab of the "Policy" window. See more in Exclude files and folders.
- Advanced - This type means advanced Exclude rules are defined in the "Advanced Excludes" tab of the "Policy" window to exclude files and folders on the basis of the mask ("pattern"). See more in Exclude files and folders.
- Recursive - If enabled, the Exclude rule will be applied not only to the root folder files, but also to the files from sub-folders. Used only for advanced Excludes.
- Exclude Pattern - Depending on the type, in this column you can see files and folders to exclude or exclude mask.
See also: Exclude files and folders.
MySQL Tab
Displays the MySQL instances that are being replicated.
SQL Server Tab
- Backup All Database - You may see here whether you have chosen to perform a backup or not.
Exchange Tab
- Backup All Exchange Instances - You may see here whether you have chosen to perform an Exchange backup or not.
Control Panels Tab
Displays the Control Panel Instances of the selected Policy.
Columns:
- State - Current state of the Control Panel Instance. It can be defined as one of the following:
- Enabled - To display only enabled Instances.
- Disabled - To display only disabled Instances.
- Type - Displays the Control Panel Instance, which specifies what kind of control panel is being configured, such as cPanel, Plesk, Virtuozzo, etc.
- Name - The unique name of the Control Panel Instance.
- Control Panel Instance ID - The unique identification number of the Instance.
- Login - Contains the link to the page to log in and gain access to certain Control Panel data.
Advanced Policy Settings Tab
The Advanced Policy Settings section of this tab displays the advanced settings of the selected Policy.
The Recovery Point Retention section of this tab displays the following information:
- Recovery Point Limit - Displays the maximum number of stored Recovery Points. When the number is exceeded, the Recovery Points will be merged. See Merge recovery points.
- Merge Schedule - Displays the Merge Schedule of the Policy. See Schedule recovery point merges.
- Disk Safe Verification Schedule - Displays the Disk Safe Verification Schedule. See Schedule Disk Safe verification.
For more information, see Create policies.
